Taskip + Paypal
Paypal
Accept secure online payments through PayPal, the world's most trusted payment platform. Enable your clients to pay invoices instantly using PayPal, credit cards, or debit cards with seamless checkout experience.
About this Integration
Taskip allows you to integrate PayPal as a payment gateway for your business. The configuration involves setting up the App ID, Secret Key, and Webhook URL. In this guide, you’ll learn how to configure PayPal, including obtaining your PayPal App ID and Client Secret (which changes based on the mode – Sandbox or Live).
Steps to Configure PayPal in Taskip
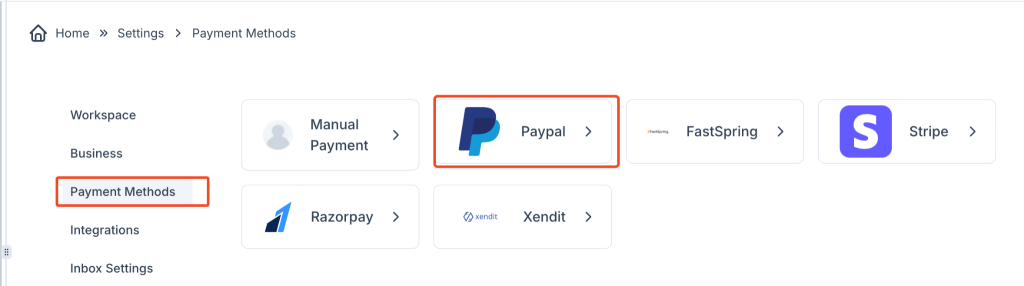
1. Access Payment Settings
- Navigate to the Settings Page:
- In the Taskip dashboard, go to Settings from the main menu and click on Payment Methods.
- You’ll see a list of available payment gateways (e.g., Manual Payment, Razorpay, Xendit). Click on PayPal.
2. Enable PayPal Payment Gateway
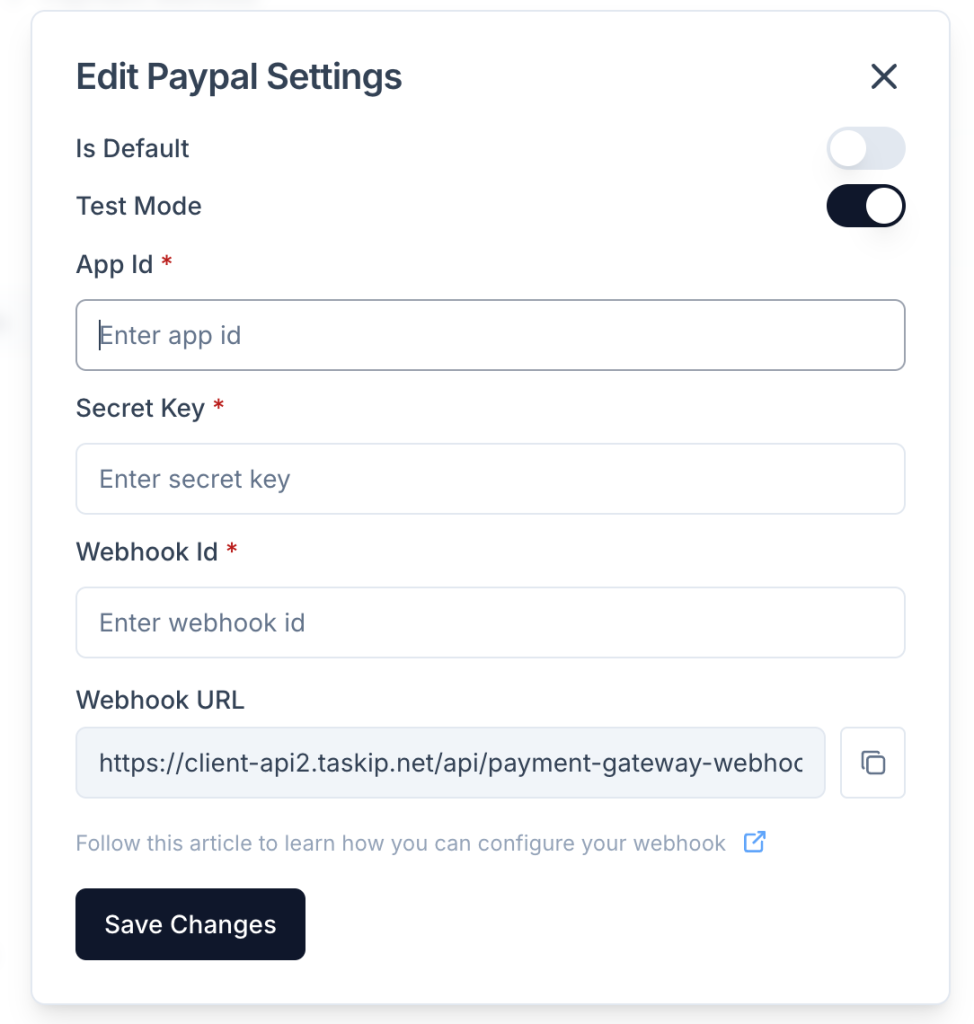
- Activate PayPal:
- On the PayPal settings page, toggle the Is Default option to enable PayPal as your default payment gateway.
3. Switch to Test Mode (Sandbox)
- Test Mode:
- For development and testing, toggle the Test Mode setting on.
- This will allow you to test transactions using PayPal’s sandbox environment without real money being involved.
4. Enter PayPal App ID and Secret Key
- App ID:
- The App ID is your unique identifier for the PayPal application you’ve created. You can get your App ID from your PayPal developer account.

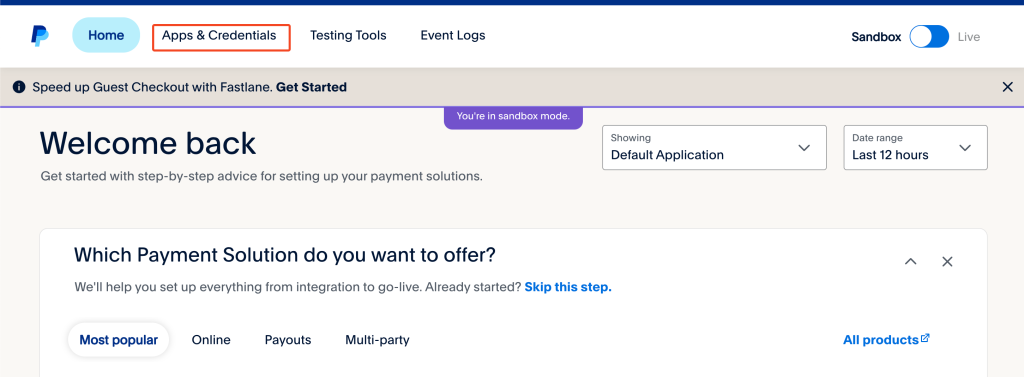
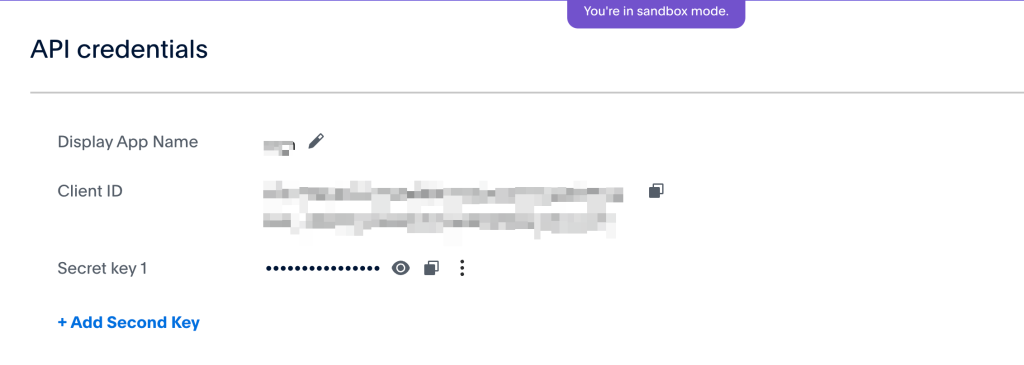
How to get the PayPal App ID: – Log into your PayPal Developer account at developer.paypal.com. – Go to Dashboard > My Apps & Credentials. – Under the REST API apps section, click on Create App. – After creating the app, you’ll be able to see the App ID. Copy this and paste it into the App ID field in Taskip.
- Client Secret (Test Mode):
- If you’re in Test Mode, you’ll use the Client Secret provided in your PayPal developer dashboard. This is used for authenticating the API requests.
How to get the PayPal Secret Key: – On the same My Apps & Credentials page, under your created app, you’ll find the Client Secret. Copy and paste it into the Secret Key field in Taskip.
5. Configure for Live Mode
- Live Mode:
- When you’re ready to switch to Live Mode, toggle Test Mode off and enter the App ID and Access Token for live transactions.
How to get PayPal App ID and Access Token for Live Mode: – App ID: The App ID for Live Mode is the same as the one obtained in the sandbox environment. – Access Token (Live Mode): – Go to the My Apps & Credentials page in your PayPal developer account. – Under Live App (after switching from Sandbox to Live), select the app you’ve created. – Scroll down to Access Token and click Generate Token. Use this Access Token as your Secret Key in Taskip for Live Mode.
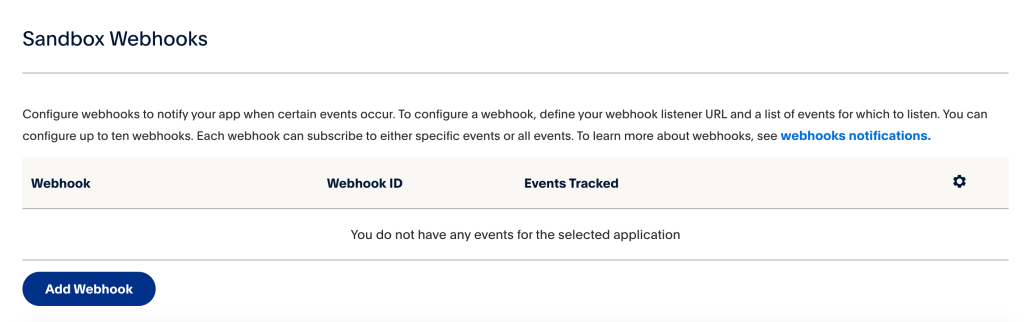
6. Set Webhook URL
- Webhook Configuration:
- PayPal uses webhooks to notify your system about payment updates. You’ll need to configure a Webhook URL to handle these notifications.
- In the PayPal settings of Taskip, enter the following Webhook URL you found in the paypal settings
- Complete Webhook Setup in PayPal:
- In your PayPal Developer dashboard, go to Webhooks.
- Create a new webhook by entering the URL provided above, and select the events you wish to track, such as Payment Sale Completed or Refund.
7. Save Changes
- Once you have filled in all the required fields, click the Save Changes button to store your settings.
Testing and Going Live
- Test Mode: Test your integration thoroughly by using PayPal’s sandbox environment. You can use PayPal’s test credentials to simulate transactions without real money being involved.
- Live Mode: Once you’re confident that your setup is working, toggle Test Mode off and switch to Live Mode. Enter your Live App ID and Access Token to begin processing real payments.
Summary
By configuring PayPal in Taskip, you can seamlessly integrate payment processing into your platform. Ensure you obtain the App ID and Secret Key from PayPal’s developer portal, and use the correct credentials for either the Test Mode or Live Mode. Webhooks are essential for receiving real-time payment updates, so make sure they are properly configured in both PayPal and Taskip. With PayPal integrated, you can easily manage payments and provide your customers with a secure and reliable payment experience.
How to Configure PayPal Payment Gateway in Taskip
Step 1: Access Payment Settings Navigate to your Taskip dashboard and go to Settings → Payment Gateways → PayPal.
Step 2: Get PayPal API Credentials
- Log in to your PayPal Business account at developer.paypal.com
- Navigate to My Apps & Credentials section
- Click on “Create App” under REST API apps
- Name your app (e.g., “Taskip Integration”) and click “Create App”
- Copy your Client ID and Secret Key
Step 3: Configure in Taskip
- Return to Taskip’s PayPal settings page
- Enter your PayPal Client ID
- Enter your PayPal Secret Key
- Select your environment:
- Sandbox – For testing payments without real money
- Live – For accepting actual payments
- Set your preferred currency (USD, EUR, GBP, etc.)
- Configure webhook URL if needed for instant payment notifications
- Click “Save Settings” to activate the integration
Step 4: Test the Integration
- Create a test invoice in Taskip
- Send it to yourself or a test email
- Click the payment link and verify PayPal checkout appears
- Complete a test transaction (use sandbox mode first)
Note: For production use, ensure your PayPal Business account is verified and has necessary permissions enabled for accepting payments.
Key Features
- Instant Payment Processing Accept payments immediately through invoice links with real-time transaction updates
- Multiple Payment Options Clients can pay using PayPal balance, credit cards, debit cards, or bank accounts
- Recurring Payment Support Set up automatic recurring payments for subscription-based services or retainer clients
- Global Payment Acceptance Accept payments from clients worldwide in 200+ countries and 25+ currencies
- Secure Transaction Processing Industry-leading encryption and fraud protection with PayPal's buyer and seller protection
- Mobile-Optimized Checkout Responsive payment pages that work seamlessly on all devices
- Automatic Invoice Updates Invoices automatically marked as paid when payment is received
- Detailed Transaction History Track all payments with comprehensive transaction logs and reporting
- No Setup Fees Start accepting payments immediately with no monthly fees - only pay per transaction
- Instant Payment Notifications Receive real-time webhook notifications when payments are processed
Screenshots

Related Integrations

Razorpay
Stripe