
Automate Client Onboarding in 6 Steps: Save 10+ Hours/Week (2026 Guide)
You just signed a new client. Now comes the part nobody talks about. The 3 to 5 hours of back and forth spent chasing signatures, sending forms, waiting on scheduling, and updating your CRM. Do that for every client, and onboarding quickly becomes a bottleneck.
This is where you need to automate client onboarding to make a difference. It removes repetitive work, speeds up the process, and keeps everything organized without constant manual effort.
Automatic client onboarding is the use of workflows and tools to handle tasks like contracts, intake forms, scheduling, and CRM updates automatically, while still delivering a smooth client experience.
In this guide, you’ll learn:
- What do it mean to automate client onboarding actually means
- The 6-step workflow top agencies use
- The right tools, including all-in-one platforms and automation stacks
- What not to automate
- A simple checklist to get started
This guide is based on 5+ years of working with agencies, freelancers, and consulting teams, along with hands-on testing of real onboarding systems. The goal is simple: reduce manual work, speed up onboarding, and create a better first client experience.
Table of Contents
What Does It Mean to Automate Client Onboarding?
Client onboarding is the process that starts after a client says yes. It includes bringing them into your system, collecting the necessary information, and preparing everything so work can begin smoothly. Automating client onboarding means using software to handle these setup steps for you.
As a result, you no longer need to take the manual hassle of sending emails, intake forms, invoices, and scheduling links every time; the system takes care of these tasks automatically. Thus, you can spend less time on repetitive work and focus more on delivering the actual project.
What Are The Difficulties in Manual Client Onboarding?
Manual client onboarding may seem manageable at the beginning, but it quickly becomes inefficient and inconsistent as client volume grows. The main challenges include:
- Inconsistent client experience: Onboarding quality varies depending on who handles it, leading to uneven service delivery
- Heavy dependency on follow-ups: Teams spend significant time chasing clients for documents, approvals, and missing information
- Human errors and missed steps: Contracts, tasks, or key onboarding steps can easily be delayed or overlooked
- Poor scalability: Processes that work for a few clients break down as volume increases, requiring more manual effort instead of growth
- Time-consuming administration: Repetitive coordination tasks reduce time available for strategy, delivery, and client work
- Fragmented workflows: Using multiple tools (email, spreadsheets, messaging apps) creates confusion and slows down progress
These challenges make manual onboarding difficult to sustain in a growing business and are often the reason teams eventually shift toward automation systems.
Why Automate Client Onboarding? (The Real ROI)
Automating client onboarding is not just an operational upgrade. It directly impacts time, revenue, and scalability in measurable ways.
Time Savings
Manual onboarding typically takes 3 to 5 hours per client, depending on complexity. Automation reduces this to under 30 minutes of human involvement by streamlining tasks like contracts, intake forms, scheduling, and CRM updates. Moreover, according to Zapier, businesses that automate onboarding save an average of 10+ hours per week in administrative work.
Source: Zaiper
Revenue Impact
Faster onboarding shortens time-to-value, which improves client satisfaction and retention. According to Harvard Business Review, increasing customer retention by just 5% can increase profits by 25% to 95%. This makes onboarding speed a direct revenue lever, not just a workflow improvement.
Scaling Without Hiring
Automation allows you to handle more clients without increasing your admin workload. Thus, you can grow your client base without needing to expand your operations team. This shift happens because the repetitive operational work is handled in the background.
For example, document management and account or task setup are fully automated. Moreover, contracts, intake forms, CRM updates, and project creation are processed automatically, which removes the need for manual coordination at scale.
Error Reduction & Consistency
Manual onboarding often leads to missed steps, lost documents, and inconsistent CRM data, especially when multiple clients are handled at the same time.
Automation removes this risk by ensuring every client follows the same structured workflow. As a result, each step is completed in the correct order, data stays accurate, and no part of the onboarding process is skipped or overlooked.
Professional Experience
Automation does not remove personalization; instead, it makes it easier to deliver it consistently at scale.
You can automatically send welcome emails, follow-ups, and onboarding resources that are tailored to each client. For example, clients can receive relevant tutorials, guides, or next steps based on their stage in the onboarding process.
In addition, milestone-based automation ensures that clients are always guided on what to do next, so they never feel lost or unsure about the progress of their project.
Signs You Need to Automate Your Onboarding Right Now!
You are manually copying client data into spreadsheets or tools
New clients wait more than 48 hours for a welcome email
You often lose track of where a client is in the onboarding process
Your team handles onboarding differently for each client, with no standard system
You onboard fewer than 5 clients per month, but it still feels overwhelming
Step-by-Step Framework: Building a Client Onboarding Automation System
Before heading to automation, learn the steps you must follow to achieve the desired result effectively:
1. Understand Your Current Onboarding Flow
Before you automate anything, you need a clear picture of how your onboarding actually works today. Most businesses skip this step and end up automating a messy process, which only makes things worse.
Start by walking through your entire client journey from start to finish. Ask yourself the following questions:
- What happens after a client says yes?
- What steps are repeated for every project?
- Where do delays usually happen?
Write everything down in simple order, even if it feels basic. This step is about clarity: once you can see your process end-to-end, you can start improving it rather than guessing.
2. Mark What You Want To Automate & What Not To Automate
Before building any onboarding system, you need clarity on one simple question: what should be automated, and what should never lose the human touch? Without this distinction, teams often end up over-automating and weakening the client experience instead of improving it.
What to Automate in Client Onboarding?
Focus on automating repeatable processes and high-impact tasks while automating your client onboarding process:
- Contracts and document handling
- Intake forms and data collection
- Welcome emails and onboarding sequences
- Scheduling kickoff calls
- CRM updates and account setup
- Project and task creation
- Follow-ups and check-ins
What Not to Automate in Client Onboarding?
Not all things should be automated; keeping some materials natural is also crucial. Keep these human:
- The initial discovery/sales call; this is where trust is built
- The kickoff call itself, strategic alignment, and human presence
- Handling complaints or concerns during onboarding
- Personalized project strategy discussion
- Any communication that requires empathy or judgment
“Automation makes you efficient. But the wrong automation makes you forgettable. The first impression a new client forms isn’t just about speed — it’s about how valued they feel.”
Be careful with what to automate and what not to.
The 10–20–70 Rule for Automation Balance
A practical way to avoid over-automation is to split your workflow based on how much human involvement each task truly needs.
| Task Automation Strategy | Work Distribution |
| 10% of tasks → automate fully | Simple, repetitive tasks like sending emails, creating CRM entries, or generating tasks. These run on autopilot without review. |
| 20% of tasks → AI-assist, human reviews | Tasks like drafting messages, summarizing client inputs, or generating reports. AI speeds them up, but a human should still approve or refine the output. |
| 70% of tasks → keep human-led | Work involving judgment, trust, or relationships, such as strategy, client communication, and decision-making. |
Red Flags of Over-Automation
Over-automation doesn’t usually fail loudly; it fails quietly through the client experience. Watch for these warning signs:
– Welcome emails that feel robotic or generic
– No human follow-up after intake form submission
– Clients feel like they’re interacting with a ticket system, not a real team
– Over-standardized messaging with no context or personalization
3. Select The Right Tool For Automation
Think of automation tools as the engine behind your onboarding system. When everything connects properly, the entire process runs smoothly and feels almost effortless. When it doesn’t, you end up constantly fixing gaps and handling manual work in the background.
The goal is not to stack multiple tools together. Instead, it is to build a connected system where every part works in sync without friction. Here are a few key considerations when choosing the right tool to automate client onboarding:
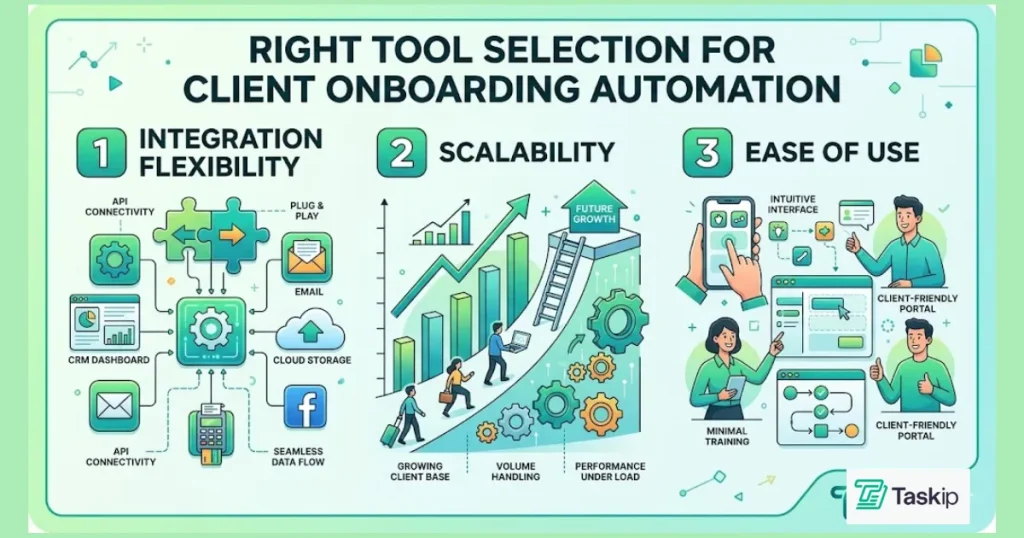
a. Integration flexibility
Your onboarding system should integrate seamlessly with your CRM, email, scheduling, document management, and project management tools. If these systems do not communicate with each other, you will still rely on manual work to move data between steps.
b. Scalability
The tool should support your business today and continue to perform well as your client volume grows 5x or even 10x. Rebuilding your entire setup later is both time-consuming and expensive.
c. Ease of use
If a system is too complex, your team will avoid using it. When that happens, automation fails in practice, even if it looks good on paper. A simple, intuitive setup ensures consistency over time.
Common tools used in onboarding workflows include:
- Calendly for scheduling calls
- Mailchimp for email automation
- External CRMs for managing contacts and pipelines
However, as businesses grow, managing multiple disconnected tools often creates more complexity than efficiency. Data gets scattered, workflows break, and maintenance becomes an ongoing task.
This is where all-in-one systems like Taskip stand out. Instead of connecting separate tools for CRM, onboarding workflows, documents, scheduling, and project management, Taskip brings everything into one unified system. As a result, your entire onboarding process can run end-to-end without switching platforms or manually syncing data between tools.
4. Set up Workflow to Automate Client Onboarding
This is where your onboarding process shifts from planning into a working system. Instead of handling each step manually, you are now designing a connected workflow that runs automatically from start to finish.
Think of your workflows as a well-oiled conveyor belt that moves every client smoothly through onboarding without you needing to micromanage each step.
At its core, every workflow follows a simple structure: trigger, action, and condition.
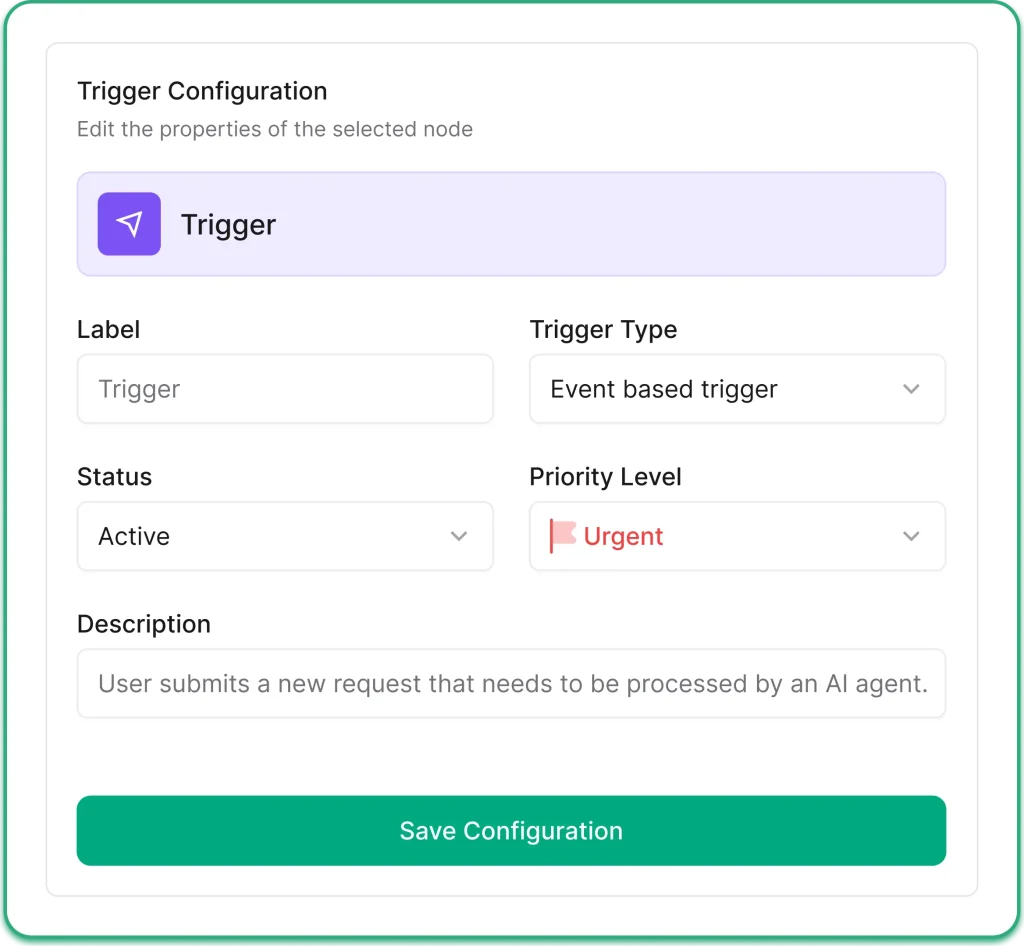
a. Triggers: Start the process
The trigger is what starts the entire workflow. It is the event that tells your system, “a new client onboarding should begin now.” This could be:
For example:
- A client signs up
- A payment is completed
- A contract is signed
The moment this event happens, the system automatically activates the onboarding process without anyone on your team needing to step in.
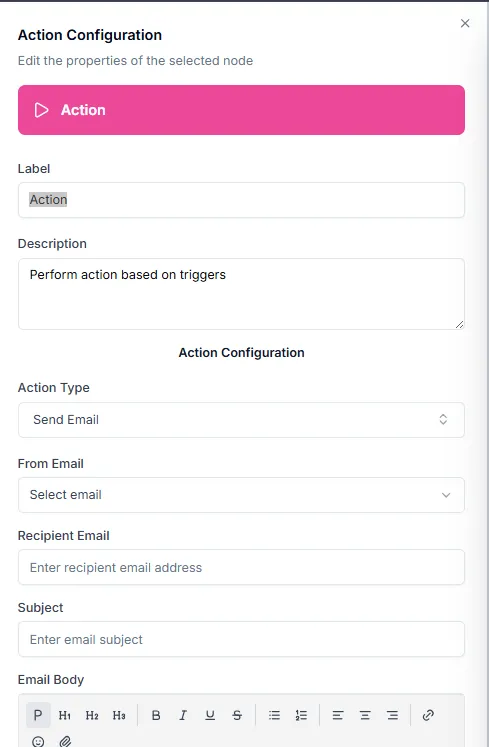
b. Actions: What the System Does Automatically
Once the workflow is triggered, the system begins executing a series of actions. These are the tasks that would normally take manual effort but are now handled automatically.
For example, when a client pays:
- Send a welcome email immediately
- Generate and send an intake form
- Create a client record in your CRM
- Notify your internal team
These steps ensure nothing gets missed and every client follows the same structured path.
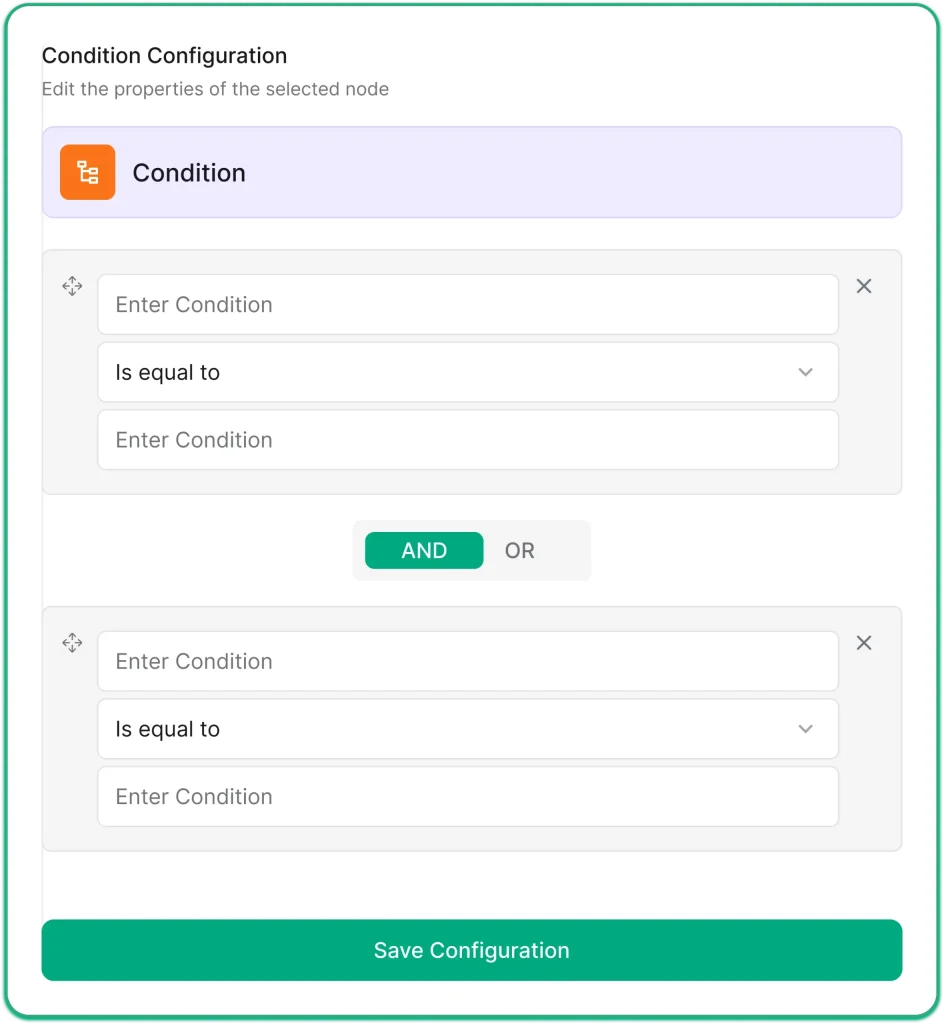
c. Conditions: Make the Workflow Adaptive
Conditions are simple rules that help your workflow respond differently based on client input. This is where basic automation becomes intelligent.
For example:
- If a client selects “needs training,” → send a tutorial series
- If a client chooses a specific service → assign the right team or resources
- If a step is delayed → send an automatic reminder
This helps tailor the experience without adding manual work.
5. Test the Entire Flow Before Going Live
Before you activate your onboarding system, you need to test it end-to-end to make sure everything works properly. Start by triggering the workflow like a real client would, such as a test payment or form submission. Then follow the full journey and check if each step works as expected. Make sure:
- Emails and messages are sent correctly
- Intake forms capture data properly
- Tasks and projects are created automatically
- Scheduling links and tools work without errors
- Personalization, like names and service type, appears correctly
Also, test it on both desktop and mobile to ensure everything looks and works smoothly on different devices. If you find any issues, fix them before going live. Once everything runs without errors from start to finish, your onboarding system is ready to launch.
6. Launch, Monitor, and Optimize
Once everything works smoothly, you can activate your automation for real clients. However, the process does not end here; you should regularly monitor how the workflow performs in real situations.
Look at how quickly clients move through onboarding, where delays happen, and whether any steps still require manual intervention. Over time, small improvements like better timing, clearer emails, or simplified forms can significantly improve performance.
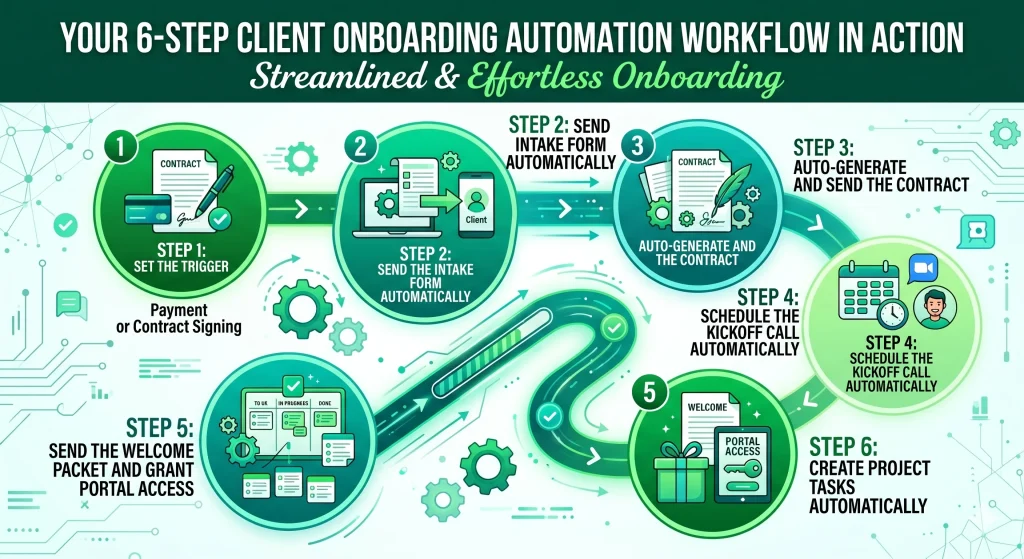
Your 6-Step Client Onboarding Automation Workflow in Action
Here is exactly how a well-built automated onboarding workflow runs, from the moment a client commits to the moment your team is ready to start work with zero manual steps in between.

Workflow Step-1: Set the Trigger: Payment or Contract Signing
Every workflow needs a starting point, and there is only one moment that should trigger it: the instant a client officially says yes. That moment is either a payment being received or a contract being signed.
It should not depend on someone checking emails or a team member manually starting the process. The moment money hits your account or a signature is captured, the onboarding should begin automatically.
If you are using tools like Zapier or Make.com, this is typically set up as:
“When a new payment is received via Stripe → start onboarding workflow.”
In an all-in-one system like Taskip, this trigger is already built into the workflow engine, so you do not need any external integrations.
Workflow Step-2: Send the Intake Form Automatically
Within seconds of the trigger firing, your client should receive the intake form in their inbox. Not after an hour or when someone remembers, but immediately.
The intake form is where you collect all the essential information needed to start the project. This includes:
- Project goals
- Target audience
- Brand assets
- Login credentials
- Billing details
- Communication preferences
Important Tip: Keep your intake form to 10–15 fields at most. Completion rates drop off sharply when forms get long. So, ask for information that you truly need.
#Don’t Miss To Automate the Data Flow
Every response should sync directly into your CRM or project system. As the client fills the form, your system should update automatically.
Tools like Taskip handle this natively, while Typeform, Jotform, and Fillout can achieve the same result through integrations. Its form builder feature further offers you templates to make the task easier.
Workflow Step-3: Auto-Generate and Send the Contract
If your trigger is a payment, the contract should be sent immediately along with the intake form. If the contract signing itself is the trigger, you can skip this step since the agreement is already completed.
For contracts, use templates with dynamic merge fields that pull data directly from your CRM, such as client name, project scope, start date, and payment terms. This ensures the system generates a ready-to-sign contract automatically, instead of manually editing each document.
The best practice is to set up automated reminders if the contract is not signed, typically after 24 hours and 48 hours, so follow-ups happen without manual effort. You can use tools like DocuSign, HelloSign, and PandaDoc for this.
If you want to keep everything in one place, Taskip’s document management handles contracts, proposals, and client documents without needing a separate tool.
Workflow Step-4: Schedule the Kickoff Call Automatically
Embed the scheduling link on the intake form’s “Thank You” page so the client can book the kickoff call immediately after submission.
Do not delay this step. If you wait and send a separate email later, conversion drops because the client has already moved on. And once the call is booked, everything should run automatically. Automate the confirmation emails and reminder sending messages so no manual effort is needed. This reduces no-shows by up to 80%!
Taskip’s meeting scheduler keeps all of this connected to the client record, so your entire team can see what’s booked and when. Calendly and Cal.com are solid standalone options, too, if you’re building a DIY stack.
Workflow Step-5: Send the Welcome Packet and Grant Portal Access
Once the intake form is submitted, you should automatically send two things at the same time: a welcome packet and access to the client portal.
Even though the process is automated, it should still feel personal. You can automatically use details the client already provides, like their name, company name, or service type, in emails and messages. This is done through simple dynamic fields that pull information directly from your system.
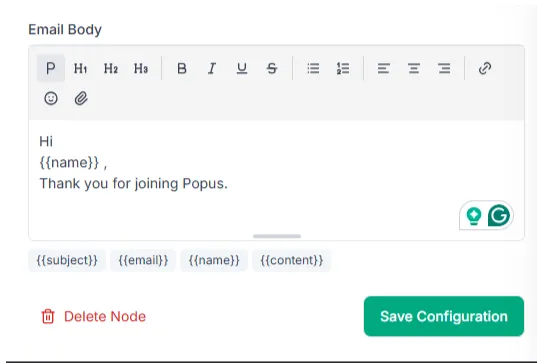
Image: Dynamic fields for personalized name in email
For example, the system can automatically say “Hi Sarah” or “Thanks ABC Agency for signing up” without you writing it manually.
You can also send different resources based on what the client selected, so the experience feels more relevant and helpful. These small touches make the onboarding feel human, even though everything is running automatically in the background.
“Personalization within automation is the difference between a system that scales your business and one that quietly damages your reputation.”
With Taskip’s client portal, granting access is part of the automated workflow- no manual invite needed. You can also personalize it with clients name within the automated system!
Workflow Step-6: Create Project Tasks Automatically
The final step moves the client from onboarding into active delivery, and it should run fully automatically without manual setup.
- Build project templates: Create templates in tools like Asana, Notion, or ClickUp. Each template should include core early-stage tasks such as assigning an account manager, collecting access details, setting up reporting, and scheduling kickoff actions.
- Create separate templates for each service type: Different services need different workflows. SEO, web design, and retainers should each have their own dedicated template so the correct setup is always triggered.
- Connect the automation trigger: Once the intake form is completed, your automation handles the rest:
| Create project from template → assign to team → set deadlines |
- Use form data to auto-fill project details: Client name, service type, and start date should be pulled directly from the intake form and used to generate the project automatically.
When everything is set up correctly, your team opens the project, and it is already structured, assigned, and ready for execution, with no manual setup required.
If you’re using Taskip, this step is already built in. You can create service-specific project templates, connect them to your onboarding flow, and auto-generate tasks the moment the intake form is completed- no Zapier or third-party tools needed. Your team gets a fully structured project on day one, completely hands-off.
Choosing Your Automation Stack: DIY vs. All-in-One
Once you decide to automate client onboarding, the next question is how you want to build the system itself. Most businesses usually take one of two approaches:
- A DIY automation stack using multiple connected tools
- An all-in-one platform that handles everything in one place
Both approaches can work, but they solve different problems.
Option A: DIY Stack with Zapier or Make.com
This approach is best for teams that already use multiple specialized tools and want to connect them into one workflow. A typical setup might look like this:
| Tool | Role |
| Typeform / Jotform | Intake forms |
| Calendly | Scheduling |
| DocuSign / HelloSign | E-signatures |
| Zapier / Make.com | Workflow automation |
| Notion / Asana | Project management |
| HubSpot / Notion | CRM and client tracking |
Here’s how it usually works: A client submits a form in Typeform, which triggers Zapier or Make.com. The automation then creates a CRM contact, sends a contract through DocuSign, schedules a kickoff call through Calendly, and creates onboarding tasks in Asana or Notion.
The biggest advantage of this setup is flexibility. You can choose specialized tools for each function and customize workflows exactly how you want.
However, as the system grows, managing multiple tools becomes expensive and harder to maintain. Costs can quickly reach $300 to $600+ per month, while broken automations and syncing issues between platforms often create additional manual work. Over time, client data also becomes scattered across different systems, making onboarding more difficult to manage.
Option B: All-in-One Platform
This approach is ideal for agencies, freelancers, and consulting firms that want a simpler system with fewer moving parts. Instead of connecting multiple external tools, platforms like Taskip, Clickup, Dubsado, HoneyBook, combine everything into one workspace:
- Forms
- Contracts and documents
- Meeting scheduling
- Client portal
- CRM
- Invoicing
- Project management
- Workflow automation
Because these features are built into the same system, workflows run natively without relying heavily on tools like Zapier or Make.com. This keeps forms, emails, projects, invoices, and client data connected in one place, reducing syncing issues and manual work.
It is also more cost-effective since businesses can manage onboarding from a single platform instead of paying for multiple separate tools. While all-in-one platforms may lack some highly specialized features, most agencies benefit more from simplicity, reliability, and centralization.
How Taskip Helps You Automate Client Onboarding?
Taskip simplifies client onboarding by turning multiple manual steps into one connected system. Instead of relying on separate tools for forms, payments, projects, and communication, everything works together automatically from the moment a client places an order.
Here’s how it works in practice:
Service Catalog for Easy Order Confirmation
Taskip allows you to create a structured service catalog where clients can view, select, and purchase your services without back-and-forth communication. You can:
- Add service descriptions, pricing, and deliverables
- Include a portfolio to showcase previous work
- Define timelines and revision limits
- Include FAQs to handle common questions upfront
- Offer different plans or subscription tiers
Once set up, clients can confirm a service and complete payment in one place. No manual intervention is required for order confirmation, which makes the onboarding process faster and more predictable.
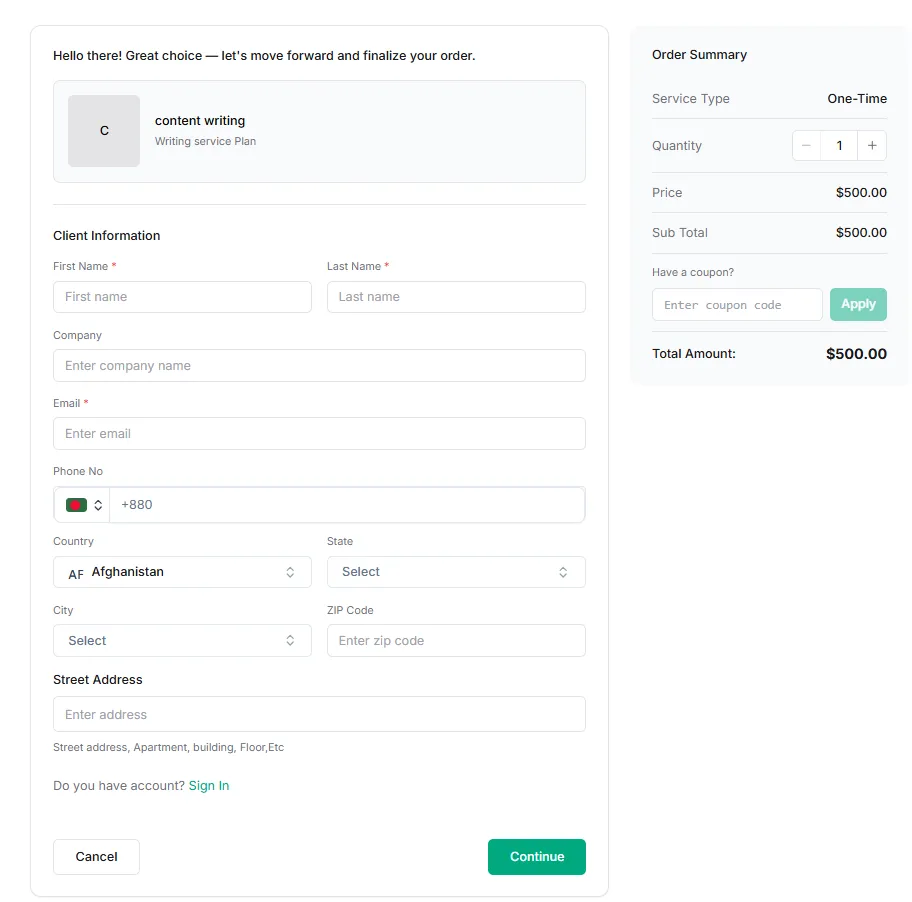
Image: Taskip Service Catalog
Learn how service catalog aids in productizing your services easily.
Auto Project and Invoice Creation
As soon as a client confirms an order and completes payment, Taskip automatically handles the next steps without any manual input. A new project is created instantly, the invoice is generated, and the client is added to your system in one seamless flow.
This ensures you do not need to switch between tools or manually set up projects and billing. Everything is triggered directly from the transaction, so your onboarding starts immediately and stays consistent for every client.
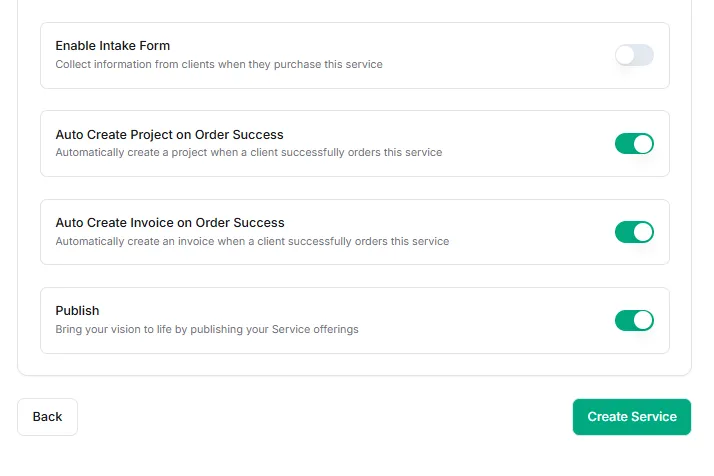
Image: Auto Project and Invoice Creation
NB: While setting up your service catalog, you will find these automation options. Once you enable them, these processes run automatically in the background without any extra effort.
Auto Information Collection with Forms
No more chasing clients for information. With Taskip, you can collect everything you need through customized intake and order forms, making the onboarding process structured and automatic.
- Pre- and Post-Purchase Forms: While creating a service catalog, you can set when to show the form, after or before a client purchases a service.
- Digital Signatures: Add agreement with in the form and let clients sign agreements online without printing, scanning, or manual handling
- Built-In Upselling: Offer add-ons or extra services directly inside the form to increase revenue without extra effort
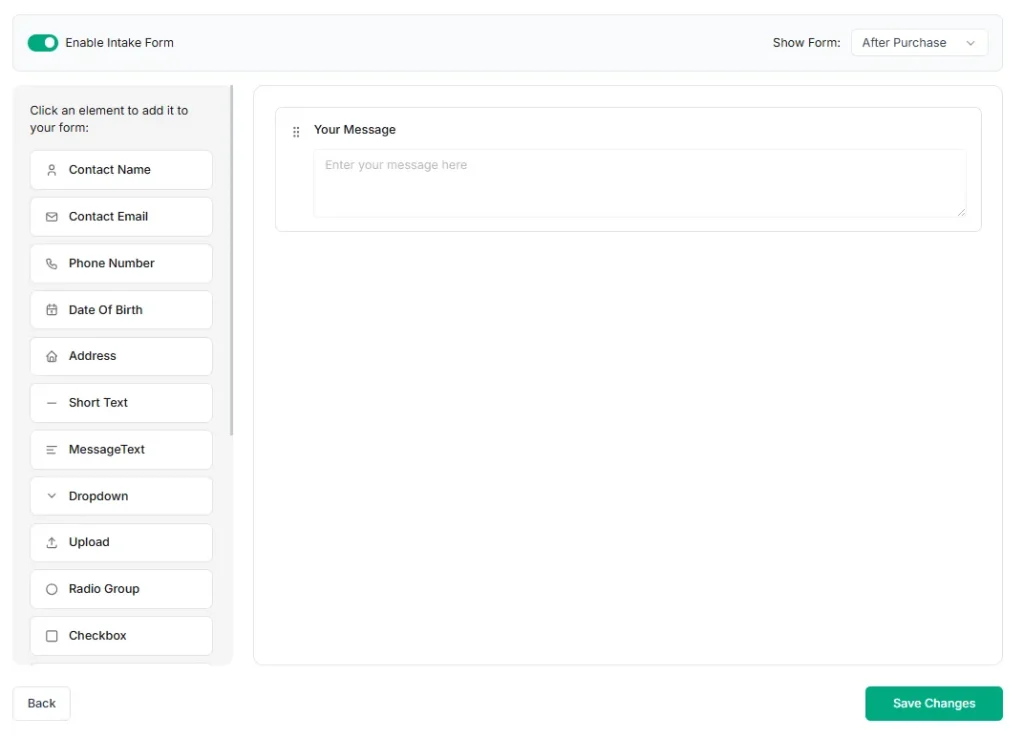
Image: Automatic Intake Form
Once a client confirms the order, the intake form is automatically sent to them. After they complete it, all the information is saved directly inside their client profile and becomes accessible through your CRM and client portal.
Send Automatic Client Invitations to Join Your Workspace
Once a client confirms payment from the service catalog, Taskip automatically sends them an invitation to join your workspace via email. This includes a direct “Access Client Portal” button, making it easy for them to get started without any manual setup from your side.
When the client clicks the button, they are taken directly to their portal, where they can view their project, track progress, and access all related updates in one place.
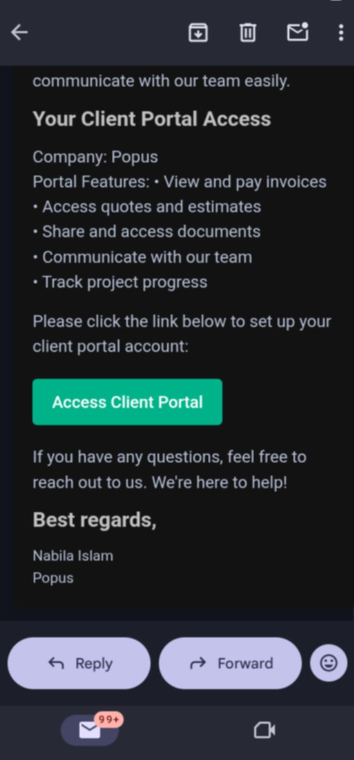
Image: Auto Invitation Via Email
Automated Team Member Assignment
Once onboarding is complete, Taskip can automatically create projects and assign tasks based on predefined templates. For example, when a client selects a specific service such as UX design, the system instantly generates the correct project structure and assigns tasks to the designated UX designer on your team.
This removes the need for manual setup and ensures every project starts in a consistent and organized way.
Easy Workflow Automation
You can automate any task inside Taskip using the workflow section by setting simple triggers, conditions, and actions. Once configured, the system runs automatically based on the rules you define, handling the entire process without manual effort.
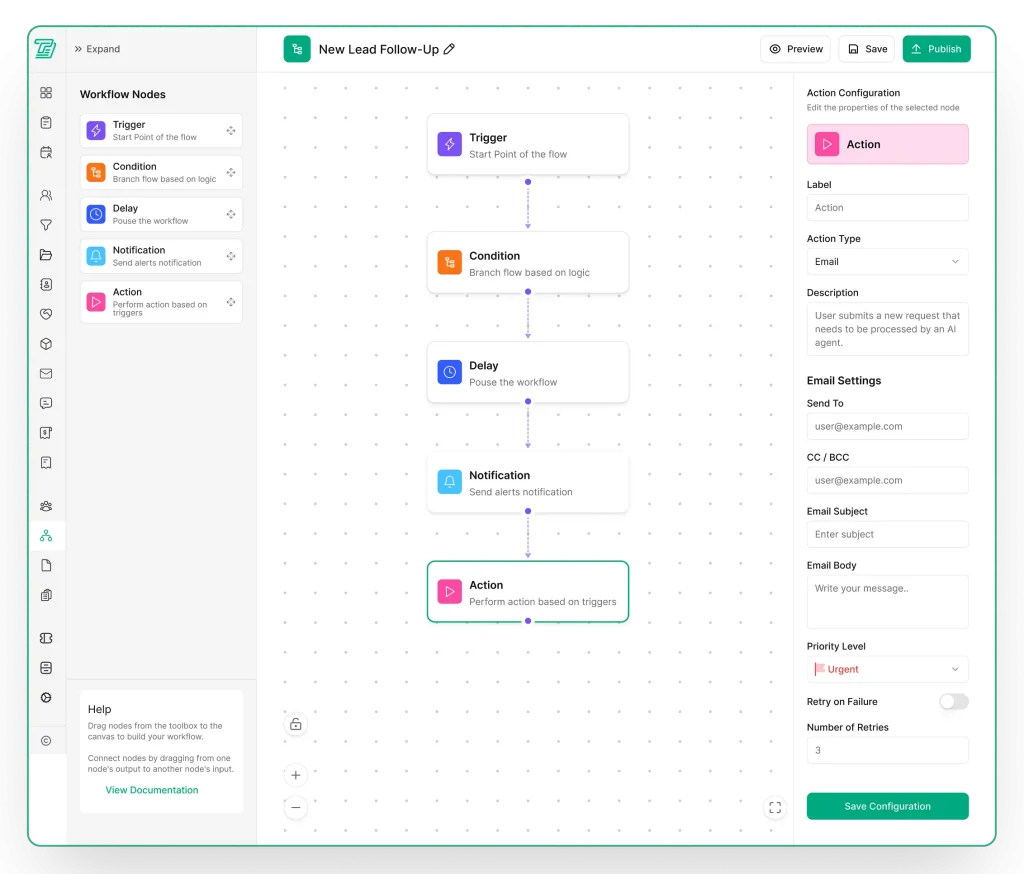
Image: Workflow
This means your onboarding, task assignments, and client updates can all run in the background while your system takes care of the execution.
In addition, Taskip offers a wide range of ready-made workflow templates, so you do not need to build everything from scratch. You can simply choose a template, adjust it based on your needs, and activate it within minutes.
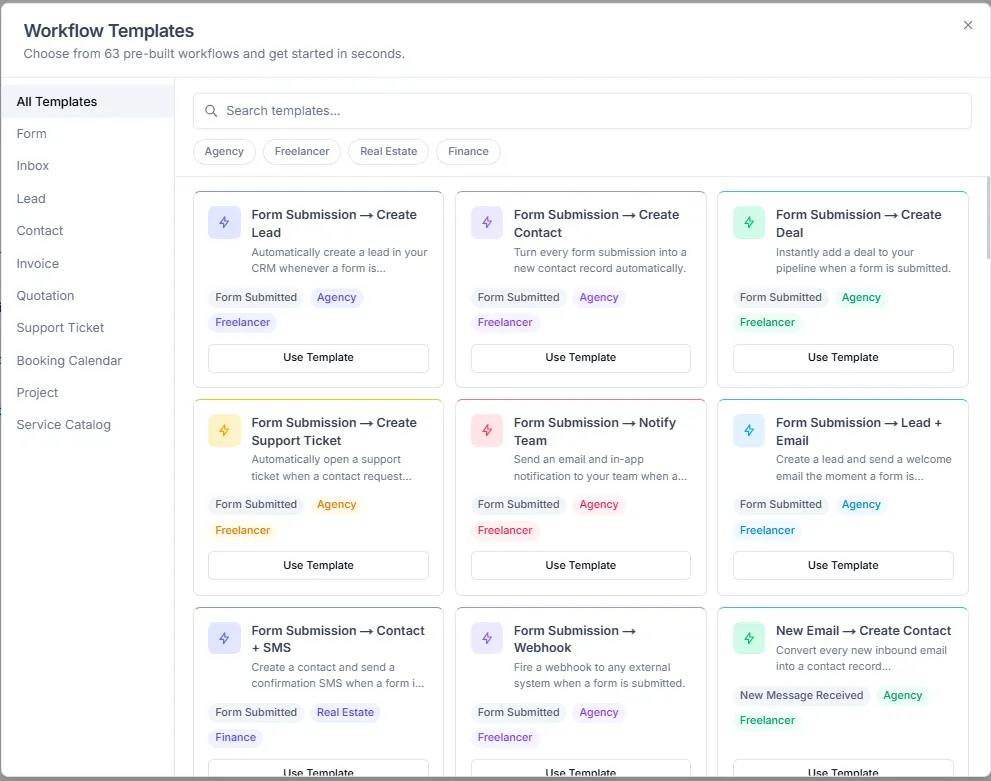
Image: Taskip workflow templates
Industry-Specific Client Onboarding Workflows
Onboarding is not one-size-fits-all. For instance, a law firm client needs compliance and documentation, whereas a creative agency client needs speed and collaboration. Though the automation system stays the same, the workflow details change based on the industry.
Here are some industry-specific automations that you must consider while onboarding a client:
| Industry | Trigger | Key Automations | Workflow Focus |
| Agencies (Marketing, Design, Creative) | Contract signed | • Creative brief form• Brand asset upload portal• Onboarding call scheduling• Slack/Discord channel creation | Campaign onboarding built for fast collaboration and execution |
| Freelancers | Invoice paid (upfront deposit) | • Simple intake form• Project scope confirmation• Optional NDA workflow• Welcome email with working hours and communication style | Lightweight, personal onboarding without unnecessary complexity |
| Consulting Firms | Engagement letter signed | • Detailed discovery questionnaire• Stakeholder contact collection• Automated kickoff agenda• Consultant assignment notification | Structured information gathering and clear project alignment |
| Professional Services (Law, Accounting, Finance) | Retainer agreement signed + payment received | • KYC and identity verification collection• Secure document upload portal• Confidentiality agreement workflow | Compliance-driven onboarding with strong focus on security and documentation |
How to Measure Onboarding Automation Success?
Most onboarding systems look “automated” on the surface, but the real test is performance. If you don’t measure outcomes, you’re just guessing whether your workflow is actually saving time or creating hidden friction.
Track these KPIs to understand whether your onboarding automation is truly working:
| Metric | What It Measures | Target |
| Time-to-Onboard | Hours from signed deal to fully onboarded client | < 24 hours (automated) |
| Intake Form Completion Rate | % of clients who complete the onboarding form without follow-ups | > 90% |
| Contract Signature Time | Hours from sending contract to signed | < 4 hours |
| Kickoff Call Booking Rate | % of clients who schedule a kickoff within 48 hours | > 85% |
| Client Satisfaction (CSAT) | Post-onboarding survey score | > 4.5/5 |
| Admin Hours Per Client | Internal time spent on onboarding | < 30 minutes |
“If your time-to-onboard is more than 48 hours, you have a bottleneck — either in your form completion, contract signing, or manual handoffs. Automation solves all three.”
What Are The Common Mistakes When Automating Client Onboarding?
Most onboarding automation failures don’t come from the tools themselves, but from poor setup and missing operational thinking. Avoiding these mistakes is what separates a smooth system from a frustrating one.
1. Automating Before Mapping the Process
One of the most common mistakes is trying to automate a workflow that isn’t clearly defined yet. If the steps aren’t mapped out first, automation just turns confusion into a bigger system problem.
2. Using Too Many Disconnected Tools
Adding too many apps and automation layers might feel powerful at first, but it usually creates more friction than it removes. When tools don’t integrate cleanly, maintenance becomes a constant headache.
3. Skipping the Personal Touch
Automation often leads to messages that feel cold or repetitive. Simple things like “Hi [First Name], welcome” don’t create a connection. Clients still expect some level of warmth, even in automated workflows.
4. No Backup When Automation Fails
Automations aren’t perfect. If a workflow fails and there’s no alert or backup process, clients can get stuck without anyone noticing, which damages trust quickly.
5. Skipping Real-World Testing
Many teams launch onboarding without fully experiencing it themselves. Running through the process as a client often reveals small but important gaps that were missed during setup.
6. Asking for Too Much Information Too Early
Long intake forms can overwhelm new clients and reduce completion rates. It’s better to keep the first step simple and gather additional details later when needed.
7. No Ongoing Improvement Loop
Onboarding shouldn’t be a “set it and forget it” system. Without regular review, small inefficiencies build up over time and slowly reduce the overall experience.
Security and Compliance in Automated Onboarding
When you automate client onboarding, you’re handling sensitive client data from day one. Security and compliance need to be built into the system from the beginning.
- Use GDPR-compliant platforms and always check data processing agreements (DPAs) before adding any tool
- Use encrypted document sharing and e-signature tools to protect client files
- Avoid sending sensitive data like ID copies or bank details through unencrypted email
- Ensure KYC/AML-ready workflows for regulated industries with proper audit trails
- Enable two-factor authentication (2FA) for all client portal access involving sensitive data
- Limit access internally so only the right people can view or edit client information
Your onboarding system deals with sensitive data from the first interaction. Security shouldn’t be an extra step; it should be part of the foundation.
Taskip is GDPR compliant tool and grants EU citizens stronger rights and control over their personal information.
The Bottom Line
When you automate client onboarding, you’re not removing the personal touch; you’re making it more consistent, more reliable, and less dependent on constant manual follow-ups or memory.
Every hour spent on manual onboarding is an hour taken away from client delivery, strategy, and business growth. A well-built system doesn’t just save time; it ensures every client experience is smooth, predictable, and scalable from day one.
The agencies and freelancers winning in 2026 aren’t working harder on onboarding — they’ve built systems that run without constant supervision. That shift is what turns operational chaos into scalable growth.
Now you have the blueprint to build that system. Start building a faster, more consistent onboarding system with Taskip.
FAQs
What is the best tool to automate client onboarding?
The best tool depends on your setup. All-in-one platforms like Taskip handle forms, contracts, scheduling, client portals, and project management natively. For teams with existing tool stacks, Zapier or Make.com can connect them. For enterprise, Rocketlane and HubSpot offer more advanced options.
How long does it take to set up client onboarding automation?
A basic automated system (intake form + contract + welcome email + kickoff scheduling) can be set up in a single day using a platform like Taskip. A complex DIY stack with multiple tools may take 1–2 weeks to configure and test properly.
Can I automate client onboarding without technical skills?
Yes. Modern all-in-one platforms like Taskip use visual workflow builders that require no coding. Even Zapier’s interface is largely drag-and-drop. The main skill required is process documentation, knowing your current onboarding steps clearly.
How do I make automated onboarding feel personal?
Use dynamic fields in emails (client name, company, project type), send a personal video welcome using Loom, keep the kickoff call human, and add personalized notes to the welcome packet. Automation handles logistics; humans handle relationship-building.
What should be in a client onboarding intake form?
Core fields: full name, company, project goals, budget range, key stakeholders, communication preferences, brand assets upload, and relevant logins/access. Keep it under 15 fields; long forms reduce completion rates.
Is client onboarding automation suitable for freelancers?
Absolutely. Even a simple sequence, intake form + contract + welcome email + scheduling link- saves 2–3 hours per client and creates a professional impression that justifies premium pricing.
Get Summary On: