
Client Portal Onboarding: The Complete 7-Step Setup Guide (2026)
Client portal onboarding is the process of introducing a new client to your secure, branded portal, guiding them from account setup through their first real use of it, so the portal becomes their primary way of working with you instead of email.
It gives you a single, repeatable process to run every new client through, rather than managing onboarding manually each time. This guide covers exactly that process: a 7-step client portal onboarding system you can adapt to any client type, plus the tools, checklist, and metrics to run it well.
TL;DR: Quick Summary
A client portal succeeds when it’s backed by a structured onboarding process, not just software.
- Match onboarding to the client’s needs: high-touch for complex clients, automated for self-serve.
- Make the first portal task simple to build early momentum.
- Deliver training over several weeks instead of one long session.
- Automate repetitive tasks so your team can focus on client interactions.
- Track first logins and onboarding completion within the first 30 days to measure adoption early.
Table of Contents
What Is a Client Onboarding Portal?
Client portal onboarding is the process of introducing a new client to your client-facing portal: setting up their account, walking them through the portal’s core features, and getting them to complete their first real task inside it. Done well, it’s what turns the portal into the client’s default way of working with you, instead of one more login they forget about after week one.
The portal itself is just the workspace: a branded, secure place where the client completes setup tasks, uploads or signs documents, and tracks project progress. Onboarding is the process that gets them actually using it. You can have a well-built portal and still fail at onboarding if you skip straight from “here’s your login” to expecting full adoption.
Is Client Portal & CRM the Same?
A client portal is not the same thing as a CRM. A CRM organizes what your team knows about a client internally. A portal is what the client actually sees and uses. Most growing service businesses eventually need both, and the two work best when they are set up to complement each other rather than duplicate each other.
If you are also relying on a CRM during onboarding, our guide to the must-have CRM features for client onboarding walks through which CRM capabilities actually support a smooth handoff into the portal.
Why Is Client Portal Onboarding Important?
The Cost of Poor Onboarding
If you run onboarding over email, you’ll run into three recurring problems. Your clients lose track of what’s expected of them. Your team repeats the same explanations for every new account, since nothing is documented anywhere clients can reference it. And small misunderstandings that a portal task would resolve immediately instead show up later as support tickets. The result is slower time to value and clients who trust your tools less than they should.
The Business Case for Getting It Right
Harvard Business Review’s research on optimizing the B2B customer onboarding experience shows that the first few weeks of a client relationship set the trajectory for everything after. If your clients understand how to work with you early, they stay engaged longer.
Personalization plays into this too. McKinsey’s research on personalization shows tailored experiences consistently outperform generic ones. If you pre-configure a client’s portal with their branding, project structure, and team setup, it reads as personalized from the first login. A blank, generic workspace doesn’t.
The portal itself won’t produce these outcomes. The process you run through it does. What the portal gives you is a consistent place to run that process, instead of leaving it fragmented across email.
Choose the Client Onboarding Process For Your Client Type
Your clients don’t all need the same onboarding process. If you apply one process uniformly, you’ll typically overserve your smaller accounts with steps they don’t need, and underserve your complex accounts that need more direct attention.
Before you build out the 7-step process below, decide which of these three models fits most of your client base. If your roster is varied, you may need more than one.
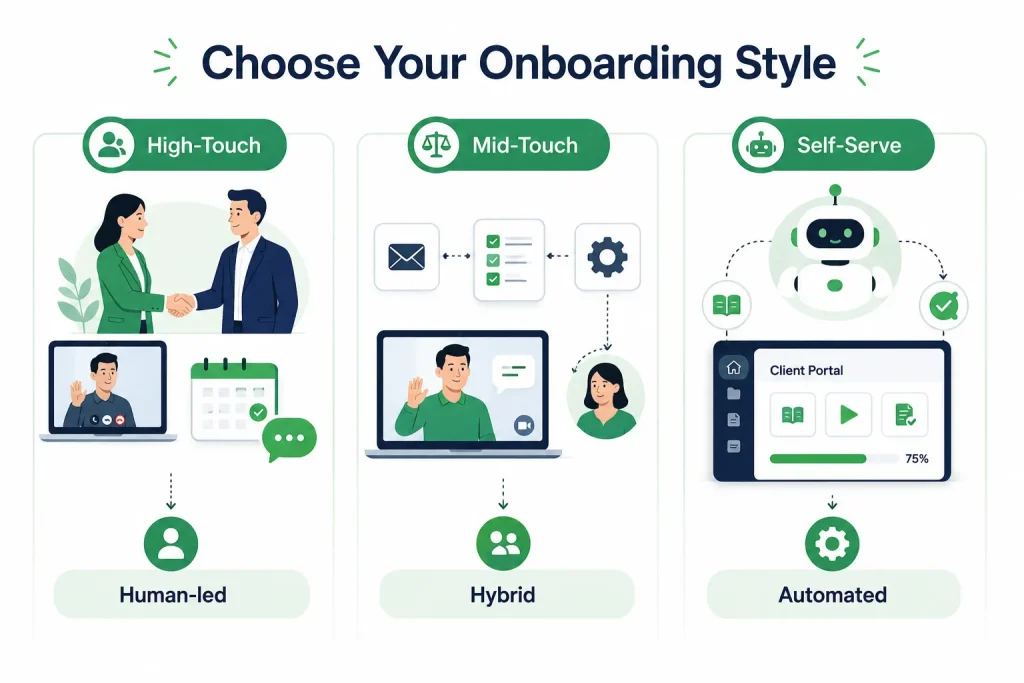
a. High-Touch Clients
For larger accounts, complex projects, and relationship-driven industries like legal and consulting, you need to be directly involved. Automated communication supports this process, but it won’t replace you. Prioritize Step 3 and Step 4 below, and schedule at least one live conversation in the first two weeks.
b. Mid-Touch Clients
Most professional services firms sit here. A templated welcome sequence plus one live check-in is usually enough. This is where you’ll see the fastest return from a portal, since it handles the repeatable tasks automatically and frees you up to spend your time on the moments that actually need it, like a kickoff call or a scope clarification.
c. Self-Serve Clients
For smaller accounts, transactional work, or high client volume, build a fully automated path: automated account creation, a self-guided walkthrough in the portal, and check-ins triggered by usage rather than a fixed schedule. If you’re still running this manually today, this is usually where you’ll get the biggest time back. Our guide on how to automate client onboarding covers workflows built specifically for this group.
The 7-Step Client Portal Onboarding Process: Step-by-Step
This is the process that decides whether your client adopts the portal, uses it halfway, or reverts to email. Work through it in order. The sequence stays the same across client types; what changes is how much manual attention you put into each step, based on the previous section.
| Step | Goal | Typical Owner | Timeframe |
|---|---|---|---|
| 1. Pre-Boarding Preparation | Portal and templates ready before the client logs in | Onboarding or CS team | Before contract signing |
| 2. Account Creation & Access | Client can log in securely on day one | Ops team or automated workflow | Day 1 |
| 3. Welcome & Initial Communication | Client knows what to do first | Account manager | Day 1 to 2 |
| 4. Hands-On Training | Client can use core features independently | CS or support team | Weeks 1 to 3 |
| 5. First Project Launch | Client sees measurable value in the portal | Project lead | Weeks 2 to 4 |
| 6. Feedback Collection | You identify and fix process gaps | CS or product team | End of onboarding |
| 7. Scaling & Long-Term Success | Client stays engaged beyond the first project | Account manager | Ongoing |
Step 1: Start With Pre-Boarding Preparation
Do this before the client ever logs in. Once the contract is signed, or close to it, set up the portal with that client’s branding, project structure, and any templates specific to how you work with clients like them. That means building the folder structure, applying the right permission levels, and pre-loading intake forms or reference materials.
This step shapes the client’s first impression directly. If the portal already reflects their setup, it signals a process that’s already working. A blank template signals the opposite, and that’s hard to walk back later.
If you’re building this setup from scratch for every client, stop and build one standard template per client type instead, using the categories from the previous section as your starting point. That turns pre-boarding into a five-minute task instead of an hour of setup.
Step 2: Set Up Account Creation and Access
Once the portal is ready, send access through a secure, trackable method, such as a magic link or single sign-on invite. Don’t send credentials as plain text in an email, since that can be forwarded or lost.
At this step, also decide who gets what level of access. Your primary contact may need full administrative rights, while other team members on their side may only need to view progress or upload files. Get this right at account creation, or you’ll deal with a delayed access request two weeks in when the one person who could approve it is unavailable.
If you’re onboarding a team rather than a single contact, confirm access requirements during the sales handoff, not after the account is created. Enforce strong password requirements or SSO, and turn on two-factor authentication wherever your portal supports it. A security shortcut here is expensive to fix later.
Step 3: Send a Focused Welcome Message
Next, send the welcome message. This is the first communication your client receives after committing to work with you, and it carries more weight than almost anything else in the process. A generic “welcome aboard” message accomplishes little. A short, specific, action-oriented one accomplishes a lot more.
Aim for one completed action, not a full walkthrough of your product. That action could be logging in, confirming a timeline, or uploading a single document. Once your client completes that first action, the momentum carries into every step that follows.
Welcome Email Template
Subject: Your [Company Name] portal is ready
Hi [Client Name],
Your client portal is set up and ready to go. Here’s what to do first:
Log in at [portal link] using the credentials we sent separately.
Review and confirm the project timeline under “Overview.”
Upload [specific document] so we can kick things off.
If anything looks off or you have questions, reply here or book time with us at [scheduling link].
Looking forward to working together.
[Your name]
Note: Adjust this by client type. For a self-serve client, you can usually send this exact template. For a high-touch client, send a shorter version, then follow it with a live call within a day or two.
What to Avoid in Your Welcome Message
Don’t list every portal feature instead of the one action you need the client to take. Don’t send the welcome message and the login credentials as two separate, disconnected emails. And don’t bury the required action inside a long paragraph; make it visually obvious, since a client skimming on a phone will miss it otherwise.
Step 4: Run Hands-On Training Over Three Weeks
A single onboarding call won’t stick, especially for a tool your client has no context for yet. Instead, spread training across three weeks so your client builds an actual habit of using the portal.
Week 1: Cover the Foundations
Keep this to logging in, navigating the dashboard, and completing the one task from the welcome message. Don’t cover more than that yet. Your only goal in week one is a completed first action.
Week 2: Introduce Advanced Features
Once your client is comfortable with the basics, introduce file sharing and version history, commenting on deliverables, and any reporting or status views relevant to their project. This is also the point to mention integrations, if you connect with tools they already use.
Week 3: Optimize Based on Usage
By week three, you should have real usage data to work from. Check who’s actually logging in, what they’re using, and what they’re avoiding, then follow up based on that instead of a generic script. This is also the easiest week to automate: set a reminder triggered by login activity, rather than a fixed date, so it reaches your client exactly when they need it.
Match Your Training Format to the Client
Don’t run the same training format for every client. Give self-serve clients a guided in-portal tour plus a few help articles. Give mid-touch clients a recorded walkthrough plus a live Q&A. Give high-touch clients a real training call, and plan for more than one if the engagement is complex.
Step 5: Launch the First Project
Now put the portal to work on a real project. This is where onboarding either sticks or falls apart. If your client’s first task produces a visible result quickly, the portal becomes how they work with you. If it requires a long setup process before anything happens, you lose the momentum you built in the earlier steps.
Design that first task to be small enough to complete without help, but meaningful enough to feel like real progress. If something goes wrong here, fix it inside the portal itself, not over email, so the client’s experience of problem-solving stays consistent with everything else.
Turn on notifications for comments and status changes at this stage, so your client can see progress without asking you for it.
Step 6: Collect Feedback and Close the Loop
Ask for feedback while the onboarding experience is still fresh, not three months later during a renewal conversation. Send a short survey right after the first project milestone, and ask a direct question during any live check-in. That’s how you surface friction points before the next client runs into the same one.
Don’t skip closing the loop. If a client points out something confusing and nothing changes, you’ll stop getting that feedback. Route what you learn back to whoever owns onboarding, and where it makes sense, tell the client what changed because of what they said.
Step 7: Keep the Relationship Going
Don’t treat onboarding as finished once the first project wraps. Use the same portal your client already knows to keep the relationship active between projects: a shared resource library, a simple status view for ongoing work, and check-ins scheduled around usage rather than an arbitrary date.
A client who logs in regularly is easier for you to expand into new services, and easier to bring into a renewal conversation backed by real usage data. Keep using the portal as the long-term home for the relationship, not a tool you retire once the first project ends.
Client Portal Onboarding Tools: Taskip Vs. Baseline Vs. Motion.io Vs. Teamwork
If you’re evaluating a client onboarding portal, you’ve probably come across these three. Here’s how they stack up.
| Feature | Taskip | Baseline | Motion.io | Teamwork |
|---|---|---|---|---|
| Templated onboarding workflows | Yes | Yes | Yes | Partial |
| Branded client-facing portal | Yes | Yes | Yes | Partial |
| Automated onboarding workflows | Yes | Partial | Partial | Yes |
| Task and file centralization | Yes | Yes | Yes | Yes |
| Client self-serve access | Yes | Partial | Yes | Partial |
| Best fit | Agencies and professional services that want a dedicated client portal | Professional services firms that need structured project intake | Agencies that want a lightweight branded client experience | Teams that need internal project management plus client visibility |
Which Tool Fits Your Team
Choose Baseline if your priority is standardizing how new projects get scoped and kicked off internally. It’s built for structured intake across multiple concurrent engagements.
Choose Motion.io if you want a clean, branded client-facing layer without much internal project management attached. It works well if you already have your own internal tools and just need somewhere polished to put the client.
Choose Teamwork if you need one platform to run both internal work and client visibility, and you’re willing to trade some client-facing polish for that consolidation.
Choose Taskip if you want a dedicated, branded client portal built around the onboarding process itself, with templates, a structured training sequence, and adoption tracking included rather than added on. It also comes with more onboarding-specific automation out of the box, such as triggered welcome sequences and usage-based check-ins, which is covered in more detail in our guide on how to automate client onboarding.
 Taskip
Choose the Client Portal That Pays for Itself
Automate onboarding workflows, centralize client files and progress in one branded portal, and get every new client fully active in days, not weeks.
Sign Up for FREE!No credit card is required!
Common Client Portal Onboarding Mistakes to Avoid
1. Don’t Overload Clients With Information
If you send every feature, policy, and setup instruction in one message, you’ll overwhelm your client before they’ve logged in once. Sequence information across the training period in Step 4 instead.
2. Don’t Run the Same Process for Every Client
If you treat a small, self-serve client the same as a complex enterprise account, you’ll waste time on one end and under-serve the other. This is one of the most common reasons larger accounts specifically don’t adopt a portal, since a templated welcome sequence alone rarely earns their confidence. Use the client-type framework above to decide how much attention each account needs.
3. Don’t Skip the Follow-Up
If you send a strong welcome message and then go quiet, adoption fades fast. Build a check-in into Step 4 and Step 6, rather than treating the welcome message as your entire onboarding effort.
4. Don’t Ignore the Mobile Experience
Your clients will open the portal on a phone at some point, often to approve something quickly. If that experience is slow or missing key functionality, they’ll default back to email, and that habit tends to stick for everything else too. Test the mobile experience with the same rigor you’d apply to desktop.
5. Don’t Leave Access Policies Loose
If you allow shared logins or reused passwords, you create a security risk and a support headache the moment someone on the client’s team changes roles or leaves. Set clear access rules in Step 2 and hold to them even when a client asks for a shortcut.
Free Client Onboarding Portal Checklist
What’s in the Checklist
The checklist includes actionable tasks for every stage of client onboarding:
- Pre-boarding preparation and internal setup
- Client portal branding and customization
- Folder and workspace organization
- Client account creation
- Credential sharing and secure access
- User roles and permission setup
- Welcome email and onboarding resources
- Training milestones for Weeks 1-3
- Progress and completion checkpoints
- Feedback collection and follow-up tasks
How to Use It
- Assign the checklist to the team member responsible for client onboarding.
- Complete each task as the client moves through the onboarding process.
- Review it alongside your onboarding milestones at every stage.
- Update the checklist throughout the engagement instead of treating it as a one-time document.
- Use it to standardize onboarding and reduce missed steps as your client base grows.
Measuring Client Portal Onboarding Success
a. Adoption Metrics
Track login frequency in the first 30 days, the percentage of required setup tasks your clients complete, and the time between account creation and first login.
b. Engagement Metrics
Look past the first login to what happens after: feature usage beyond the basics, document upload activity, and whether clients come back on their own instead of only when you prompt them.
c. Business Impact Metrics
Track support ticket volume tied to onboarding, time to first value, and retention past the initial project. If your adoption metrics look healthy but these numbers aren’t moving, take a closer look at the process.
| KPI | How to Measure It | Healthy Benchmark |
|---|---|---|
| First login rate | Logins within 48 hours of account creation, divided by total accounts created | Most accounts logging in within 2 days |
| Setup completion rate | Required onboarding tasks completed, divided by total assigned | Majority completed within the first week |
| Onboarding-related support tickets | Tickets tagged as onboarding-related in the first 30 days | Trending down month over month |
| 90-day retention | Accounts still active at day 90, divided by accounts onboarded | Consistent with your overall client retention rate |
What Results Can You Expect?
The Challenge: A growing digital marketing agency was onboarding new clients almost entirely through email. The process was inconsistent, new clients often missed important resources, and the support team spent hours answering the same setup questions.
The Process: The agency implemented the 7-step onboarding process outlined above, standardized its welcome sequence, organized client resources inside a branded portal, assigned role-based permissions, and replaced fixed-date follow-ups with usage-based check-ins triggered by client activity.
The Outcome
| Metric | Before | After |
|---|---|---|
| Time to first login | 6 days | 1 day |
| Onboarding-related support tickets | 14 per month | 5 per month |
| 90-day retention | 71% | 89% |
Industry-Specific Considerations For Client Portal Onboarding
If You Run a Creative Agency
Prioritize a visual, brand-forward portal for creative agencies since your clients will review creative work directly inside it, often across several rounds. Make sure file previews, version history, and inline commenting work reliably, or your clients will go back to giving feedback over email.
If You Run a Consulting Firm
For a consulting firm, prioritize documentation and deliverable tracking over visual polish. Structure the portal around milestones and signed deliverables, so your clients can always see what’s been delivered, what’s pending, and what needs their sign-off.
If You’re a Freelancer
Keep the process light for a freelancer’s client portal onboarding. Your version of Step 1 might be a single reusable template rather than a full setup process, since you’re likely onboarding fewer clients at a time. The core sequence still applies, just in a compressed form.
If You Work in Legal Services
Treat security and audit trails as a baseline requirement, not an add-on for legal services like law firms. Build document version history, access logs, and clear permission boundaries into Step 1 from the start.
Troubleshooting Common Issues While Client Portal Onboarding
| Problem | Likely Cause | Fix |
|---|---|---|
| Client never logs in after account creation | Welcome email unclear, or credentials sent separately without context | Combine the welcome message and first-action instructions into one email, per Step 3 |
| Client keeps emailing instead of using the portal | The portal doesn’t clearly show what to do next | Redirect onboarding-related email replies back into a portal task |
| Low completion rate on setup tasks | Too many tasks assigned at once | Sequence tasks across the 3-week training period in Step 4 |
| Repeated access or permission complaints | Roles and permissions weren’t set up correctly at account creation | Revisit Step 2 and confirm permission levels before the first login |
| High support ticket volume in first 30 days | Training didn’t cover what clients actually need to do | Review ticket topics monthly and fold common questions into Week 1 training |
Conclusion & Next Steps
Your client onboarding portal will only work as well as the process you run through it. Start with the 7 steps above, match your level of attention to each client type, and track the KPIs that show whether onboarding is actually working, not just happening. If manual follow-up is eating your team’s time, that’s the fastest place to start automating.
Get started with Taskip for free or book a demo to set up this process inside your own portal.
Frequently Asked Questions
What is client portal onboarding?
Client portal onboarding is the process of introducing your new client to your client-facing portal, from account setup through their first real use of it, so it becomes their primary way of working with you.
How long does client portal onboarding take?
Most onboarding processes run 2 to 4 weeks from account creation to full adoption. Expect longer for high-touch clients and faster for self-serve clients.
What should a client onboarding checklist include?
At minimum: pre-boarding setup tasks, account creation and access steps, a welcome communication, a training sequence, your client’s first task inside the portal, and a feedback checkpoint.
How do I get clients to actually use the portal?
Point the first login toward one clear, small action. Follow up if your client hasn’t completed it within a few days. Redirect onboarding-related emails back into the portal instead of answering them directly.
What’s the difference between a client portal and a CRM?
Your CRM is an internal system you use to track client relationships and data. Your portal is client-facing: the client logs in, sees their own information, and completes tasks there. See our guide to must-have CRM features for client onboarding for how the two should work together.
How much does client onboarding software cost?
Pricing varies by platform and team size, typically ranging from per-user monthly plans for small teams to custom pricing for larger organizations that need advanced workflow or branding features.
Can client onboarding be automated?
Yes. You can automate account creation, welcome sequences, training reminders, and usage-based check-ins, so your team only steps in where it’s actually needed. Our guide on how to automate client onboarding covers specific workflows you can set up.
What security measures should a client portal have?
At minimum, use secure credential delivery, defined permission levels per user, document access logs, and encrypted file storage. If you’re in legal or financial services, confirm the compliance requirements specific to your industry too.
How do I measure onboarding success?
Track your first login rate, setup completion rate, onboarding-related support ticket volume, and 90-day retention. Together, these tell you whether clients are adopting the portal and whether that adoption is improving your business outcomes.
What’s the biggest mistake businesses make during client onboarding?
Running the same process for every client. High-touch and self-serve clients need different levels of attention, and applying one process to both usually means over-serving one group and under-serving the other.
How does Taskip compare to Baseline for client onboarding portals?
Baseline focuses on structured project intake workflows for professional services firms. TaskIP focuses more specifically on the client-facing onboarding experience, with built-in templates, training sequences, and adoption tracking. Which one you should pick depends on whether your priority is internal intake structure or client-facing onboarding depth.
What’s a good client onboarding portal checklist?
A good checklist maps directly to your onboarding process, with an owner and deadline for each step, rather than a general list of tasks. See the free checklist above for a starting structure.
Is client portal onboarding different for agencies vs. consultants?
Yes. If you run an agency, prioritize visual review and file sharing. If you’re a consultant, prioritize documentation and milestone tracking. The core 7-step process applies either way, but which steps you emphasize will differ.


Get Summary On: