Taskip’s Sales Pipeline is a powerful tool that allows businesses to track, manage, and convert leads into customers effectively. By organizing the sales process into distinct stages, your team can visualize each deal’s progress and collaborate efficiently to close sales. This feature is designed to improve workflow and ensure no opportunities are missed.
Creating & Managing a Sales Pipeline #
A sales pipeline helps structure and track the stages of your sales process, ensuring that every deal is handled at the right moment.
Steps: #
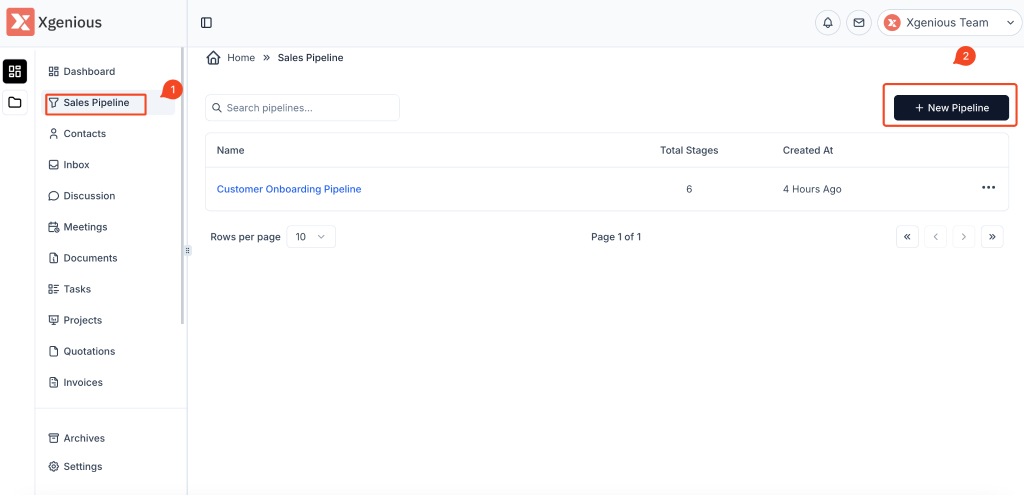
- Navigate to the Sales Pipeline Section:
- Go to the Sales Pipeline section from the left sidebar of the Taskip dashboard.
- Click the ‘+ New Pipeline’ Button:
- In the top-right corner of the page, click the + New Pipeline button to begin the creation process.
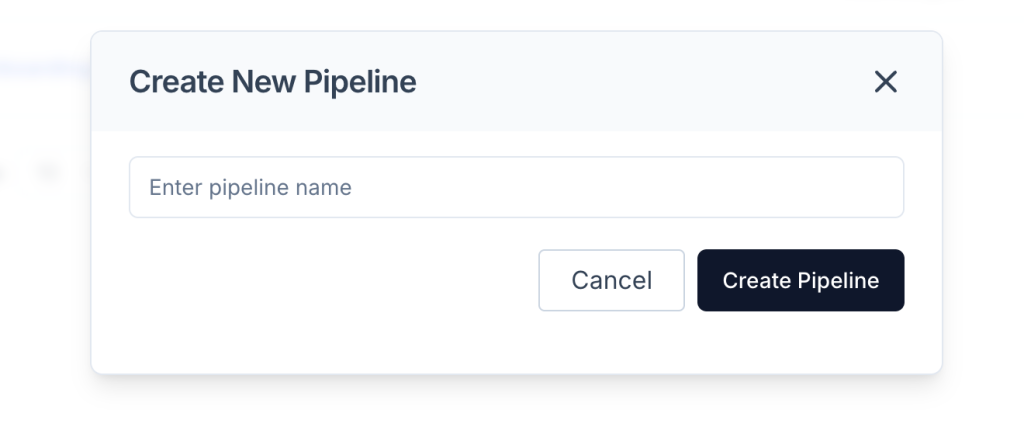
- Enter Pipeline Details:
- A modal window will appear asking for the pipeline name. For example, you can name it Customer Onboarding Pipeline or Sales Funnel.
- Save the Pipeline:
- After entering the name, click the Create Pipeline button to finalize the creation.
Insight: #
Creating a pipeline helps centralize your sales efforts and provides a clear roadmap for your team. It ensures that everyone is on the same page regarding the sales process, making it easier to prioritize and manage deals.
Managing Pipeline Stages
Pipeline stages represent different phases in your sales journey. These stages allow you to categorize your deals, track their progress, and know exactly where each deal stands.
Steps: #
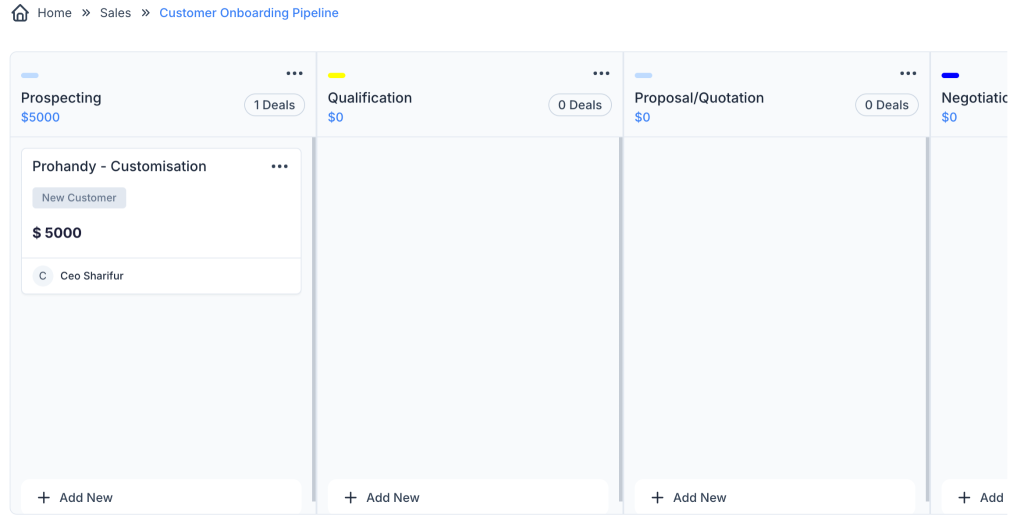
- Default Stages:
- The pipeline comes with default stages like Prospecting, Qualification, Proposal/Quotation, and Negotiation. Each stage reflects a critical part of the sales process.
- Customizing Stages:
- You can add or modify stages based on your business needs. Click on the Settings icon to edit the stages, rename them, or add new ones.
- Track Deals in Stages:
- As you move deals through the pipeline, simply drag and drop them into the appropriate stage.
Insight: #
Having distinct stages in your sales pipeline ensures that no steps are skipped in the process. It provides a clear view of where each deal is and allows you to focus on the most important tasks at any given time.
How to add a new stage to the sales pipeline? #
To add a new stage in the sales pipeline, follow these steps:

1. Navigate to Your Pipeline
- Open the Sales Pipeline view in your CRM.
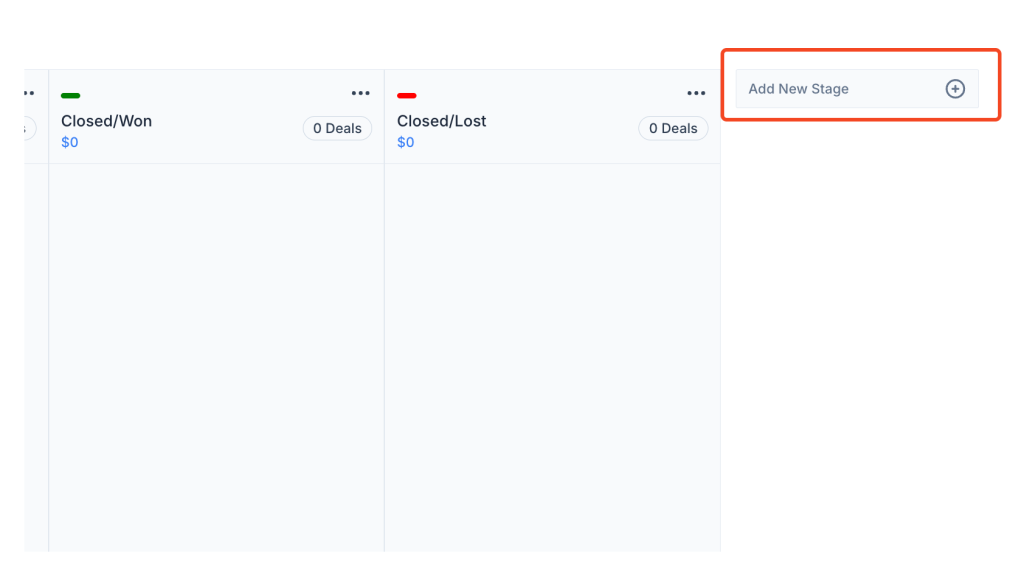
2. Click on “Add New Stage.”
- On the right side of the pipeline, you will see an option labeled “Add New Stage” (usually located at the end of the current stages).
- Click on the Add New Stage button.
3. Enter Stage Name
- A prompt will appear asking you to enter the stage name. Choose a descriptive name for the new stage that fits your sales process.
4. Customize the Stage (Optional)
- Some systems may allow you to customize additional settings for the stage, such as color, probability of closing, or other properties that define how this stage functions within your pipeline.
5. Save the Stage
- After naming and customizing the stage, click Save or Add Stage (depending on your system) to add the new stage to your pipeline.
How to rename a stage in a pipeline? #
To rename a stage in the sales pipeline in Taskip, follow these steps:
To add a new stage in the sales pipeline, follow these steps:
1. Open the Stage Options
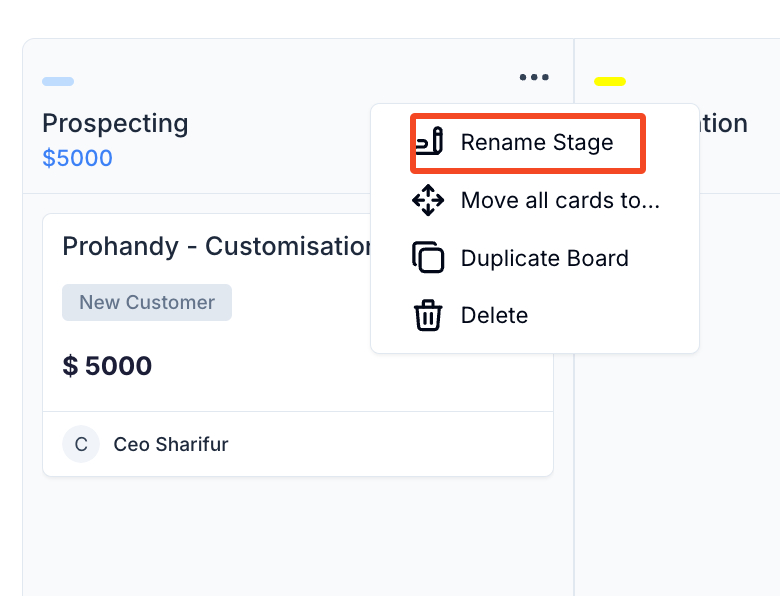
- In the Sales Pipeline, locate the stage you want to rename. For example, you might want to rename the Prospecting stage.
- Hover over the stage name and click on the three dots (•••) at the top-right corner of the stage.
2. Click “Rename Stage.”
- In the dropdown menu, click on Rename Stage.
3. Enter New Stage Name #
- A field will appear, allowing you to enter the new name for the stage. Type the new name (e.g., “Lead Generation”).
4. Save the New Name #
- After typing the new name, press Enter or click outside the field to save the changes.

How to duplicate a stage in the pipeline? #
To duplicate a stage in the sales pipeline, follow these steps:
- Locate the Stage
- Go to your Sales Pipeline where the stage you want to duplicate is located (e.g., “Closed/Won”).
2. Open the Stage Options
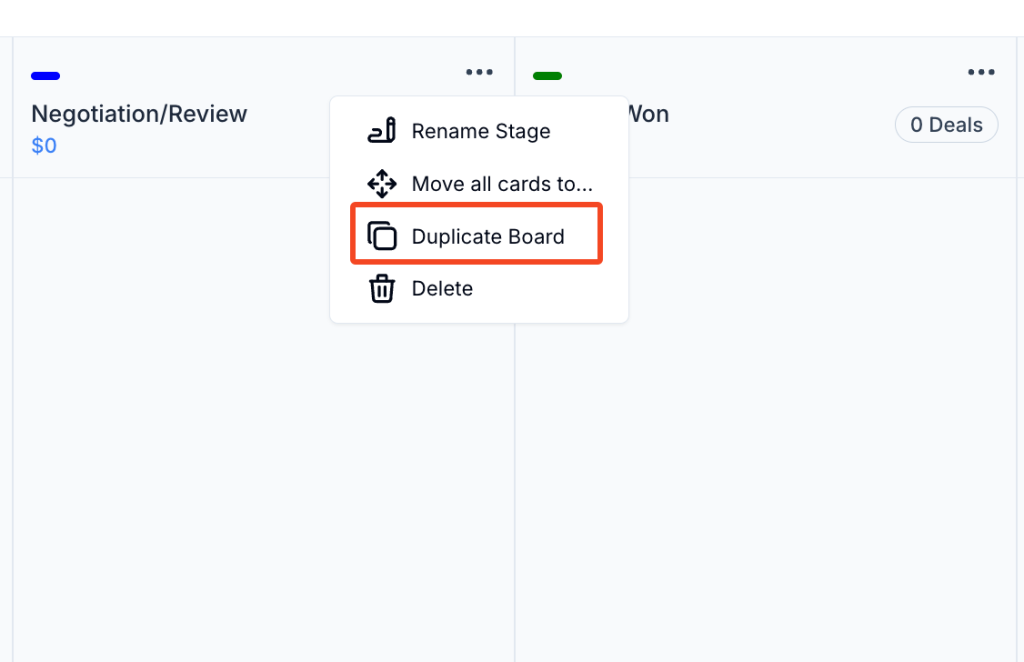
- Hover over the stage name and click on the three dots (•••) located at the top-right of the stage column.
3. Click on “Duplicate Board.”
- In the dropdown menu, you will see the option “Duplicate Board”. Click on it.
This action will create a duplicate of the stage and move it within your pipeline. You can then edit the name or settings of the newly created stage to fit your needs.
How to create a deal in the pipeline? #
To create a deal in the sales pipeline in Taskip, follow these steps:
1. Navigate to the Sales Pipeline
- Go to the Sales Pipeline section, where all your deals and stages are managed.
2. Select the Appropriate Stage
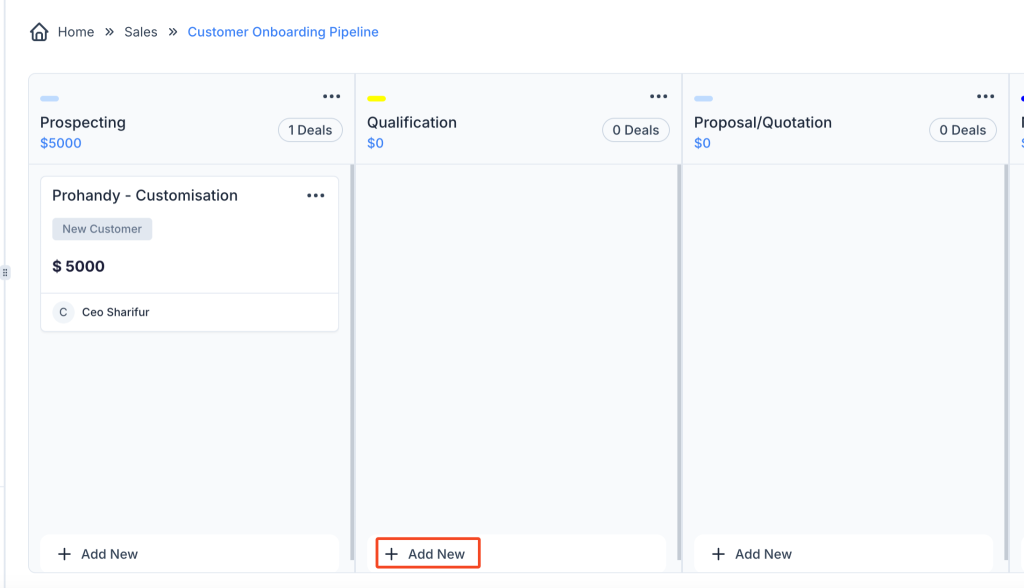
- In the sales pipeline, choose the appropriate stage where you want to add the new deal. For example, you might place a new deal in the Prospecting stage.
3. Click “Add New”
- At the bottom of the selected stage, click the + Add New button.

4. Enter Deal Information
- A pop-up form will appear for creating the deal. Fill out the following required fields:
- Deal Name: Enter a name for the deal (e.g., “Prohandy – Customisation”).
- Deal Owner: Select the team member who will own the deal.
- Select a Contact: Choose the contact related to this deal (e.g., “Ceo Sharifur”).
- Select Company: Select the company associated with the deal.
- Deal Amount: Enter the deal value.
- Select Tags: Optionally, assign tags to categorize the deal.
- Closing Date: Set a closing date for the deal.
- Description: Provide a description of the deal or any important notes.
5. Click “Create Deal.”
- After filling in all the necessary details, click the Create Deal button to save the deal in the pipeline.
6. Edit or Delete Deal (Optional)
- If you need to make changes later, you can edit or delete the deal:
- Hover over the deal card and click the three dots (•••).
- Select Edit to modify the deal, or Delete to remove it from the pipe.
How to move all deals from one stage to another in the pipeline? #
To move all deals from one stage to another in the pipeline in Taskip, follow these steps:
1. Open the Stage Options
- In the Sales Pipeline, locate the stage from which you want to move all the deals. For example, you may want to move deals from the Prospecting stage.
- Hover over the stage name, and click on the three dots (•••) that appear at the top-right corner of the stage.
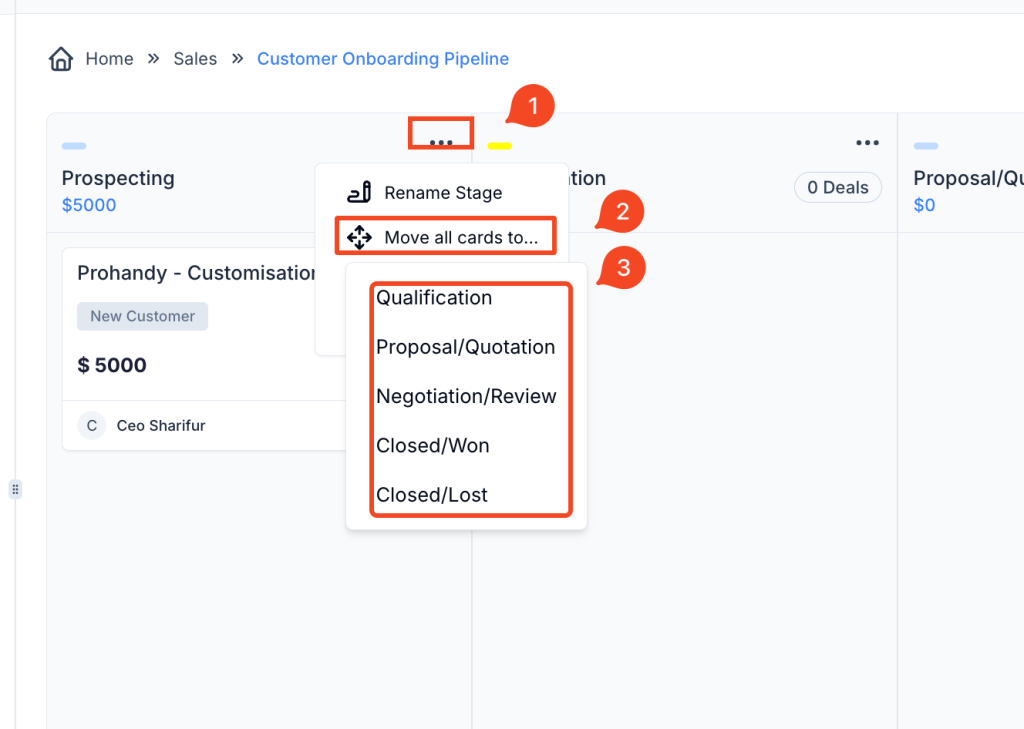
2. Select “Move All Cards To…”
- From the dropdown menu, click on the option Move all cards to….
3. Choose the Destination Stage
- A list of available stages will appear. Select the stage to which you want to move the deals (e.g., Qualification, Proposal/Quotation, Negotiation/Review, Closed/Won, or Closed/Lost).
4. Confirm the Move
- All the deals from the selected stage will be moved to the new stage.
How to add Files to a deal? #
Follow these steps to upload and attach files to a deal in Taskip’s Sales Pipeline:
Step 1: Open the Sales Pipeline
- Navigate to the Dashboard.
- Click on Sales Pipeline from the left sidebar.
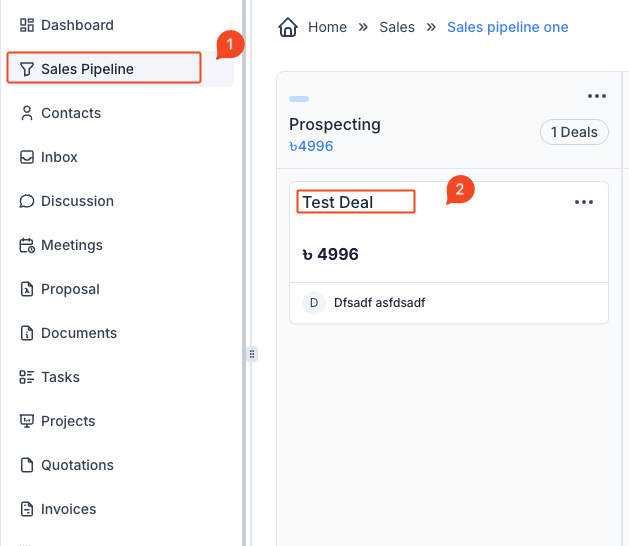
Step 2: Open the Deal
- Locate the deal you want to attach a file to.
- Click on the deal name to open its details page.
Step 3: Go to the Files Tab
- In the deal details view, find the Files tab in the top navigation.
- Click on the Files tab to open the file management section.
Step 4: Upload a File
- Click inside the Drag a file box or drag and drop a file into it.
- Select the file you want to upload.
- Click the Upload button to attach the file to the deal.
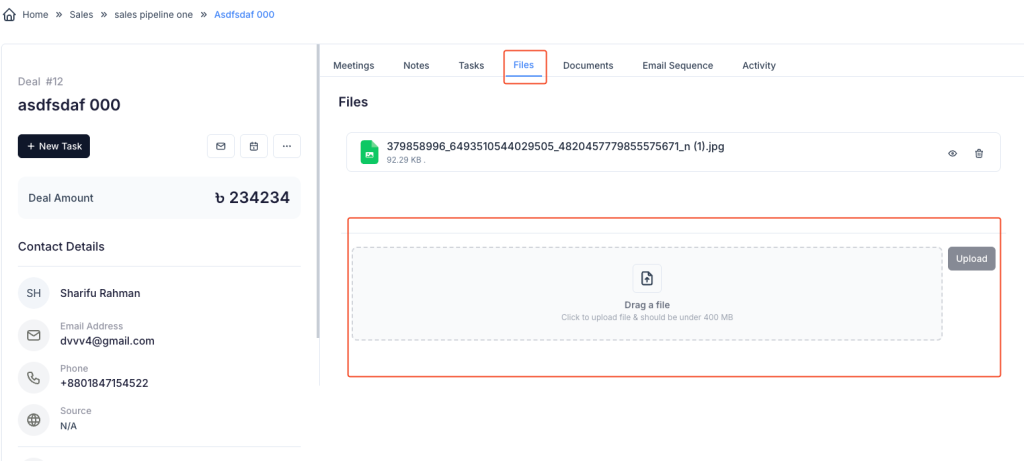
Once uploaded, the file will be listed under the Files section, where you can view or delete it as needed.
How to add a document to a deal? #
Follow these steps to attach a document to a deal in Taskip’s Sales Pipeline:
Step 1: Navigate to Sales Pipeline #
- On the Taskip Dashboard, click on Sales Pipeline from the left sidebar.

Step 2: Open the Edit Deal Modal #
- Locate the deal to which you want to add a document.
- Click on the three-dot menu (⋮) on the deal card.
- Select Edit from the dropdown.
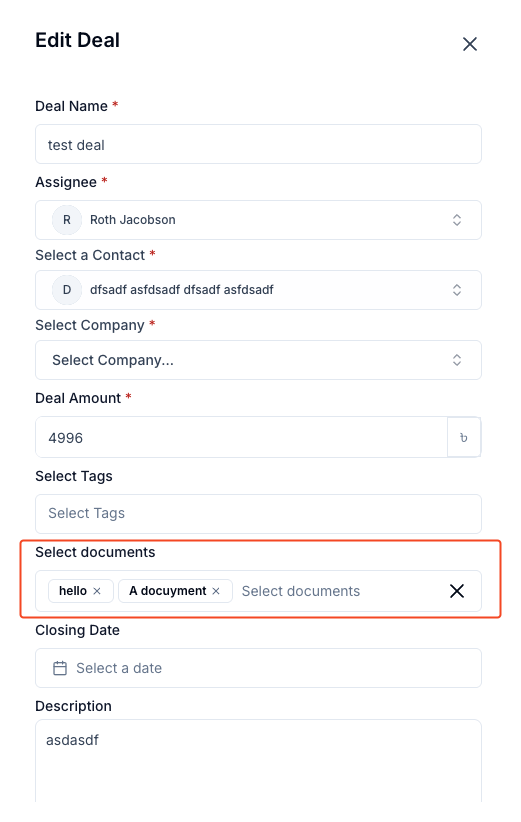
Step 3: Attach Documents #
- Scroll down to the Select Documents field in the Edit Deal modal.
- Click inside the Select Documents field.
- Choose from the available documents or add a new one.
- Once selected, the document will appear as a tag in the field.

Step 4: Save the Changes #
- Review your changes.
- Click the Save or Update button to confirm.
Your selected document is now successfully attached to the deal.
How to add a document to a deal? #
Follow these steps to attach a document to a deal in Taskip’s Sales Pipeline:
Step 1: Navigate to Sales Pipeline
- On the Taskip Dashboard, click on Sales Pipeline from the left sidebar.

Step 2: Open the Edit Deal Modal
- Locate the deal to which you want to add a document.
- Click on the three-dot menu (⋮) on the deal card.
- Select Edit from the dropdown.
Step 3: Attach Documents
- Scroll down to the Select Documents field in the Edit Deal modal.
- Click inside the Select Documents field.
- Choose from the available documents or add a new one.
- Once selected, the document will appear as a tag in the field.
Step 4: Save the Changes #
- Review your changes.
- Click the Save or Update button to confirm.
Your selected document is now successfully attached to the deal.
How to create a task inside a deal? #
To add a task to a deal in Taskip, follow these steps:
1. Navigate to the Deal #
- Go to the Sales Pipeline and click on the deal you want to add a task to. This will open the detailed view of the deal.
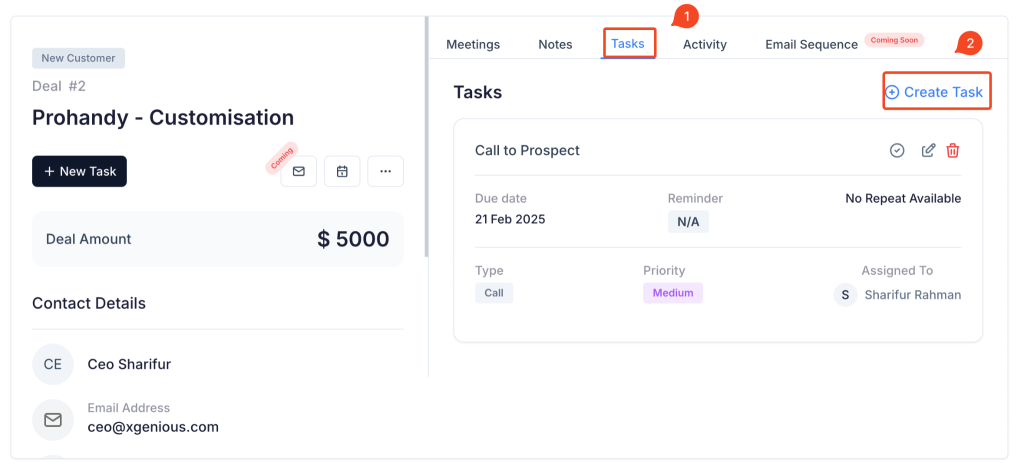
2. Access the Tasks Tab #
- In the deal view, click on the Tasks tab, which is located next to Meetings, Notes, and Activity.
3. Create a New Task #
- Click the + Create Task button, which is located in the top-right corner of the task section.
4. Fill in Task Details #
- A pop-up will appear to create a new task. Fill in the following details:
- Task Name: Enter a brief name for the task (e.g., “Call to Prospect”).
- Task Type: Select the type of task (e.g., Call, Meeting, etc.).
- Assignee: Assign the task to a specific team member.
- Priority: Set the priority for the task (Low, Medium, High).
- Select Date: Choose the due date for the task.
- Select Time: Optionally, choose a specific time for the task.
- Description: Add any relevant details or instructions for the task.
How to create a meeting inside a deal? #
To create a meeting inside a deal in Taskip, follow these steps:
1. Navigate to the Deal
- Go to the Sales Pipeline and click on the specific deal where you want to add a meeting. This will open the deal’s detailed view.
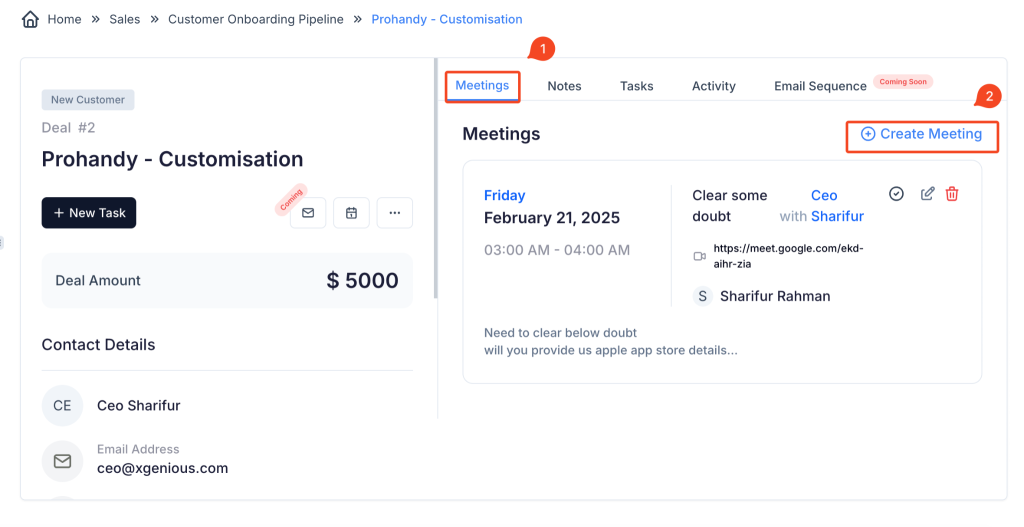
2. Access the Meetings Tab
- In the deal view, click on the Meetings tab, which is located next to Notes, Tasks, and Activity.
3. Create a New Meeting
- Click the + Create Meeting button located at the top-right corner of the meeting section.
How to add Email Sequence Steps in Pipeline Deal? #
Once an Email Sequence has been initialized for a deal, follow these steps to add Email Steps in Taskip.
Step 1: Open the Sales Pipeline #
- Navigate to the Dashboard.
- Click on Sales Pipeline from the left sidebar.
Step 2: Access the Deal’s Email Sequence #
- Click on the deal name to open its details.
- Select the Email Sequence tab.
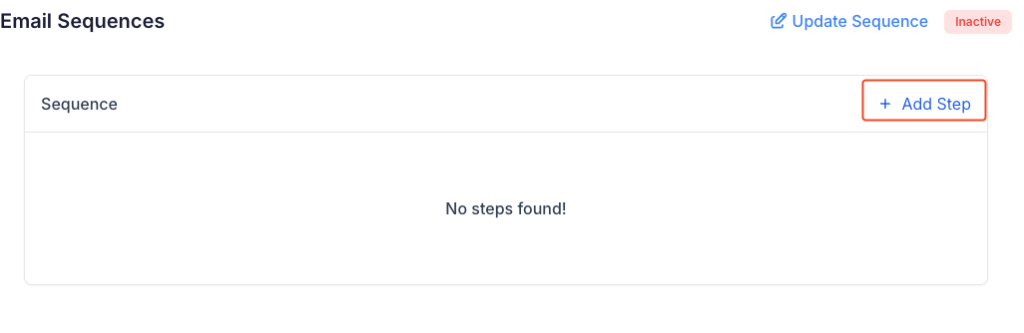
Step 3: Add a New Email Step #
- Click on “+ Add Step” in the top-right corner.
- A modal titled “Add New Step” will appear.
Step 4: Configure the Email Step #
- Step Title – Enter a title for the email step.
- Email Subject – Define the subject line of the email.
- Wait Days / Wait Hours – Specify the delay before sending this email after the previous step.
- Email Content – Write the body of the email. You can use variables such as:
{{Name}}for the recipient’s full name.{{Email}}for the recipient’s email.{{Workspace Name}}for the workspace details.
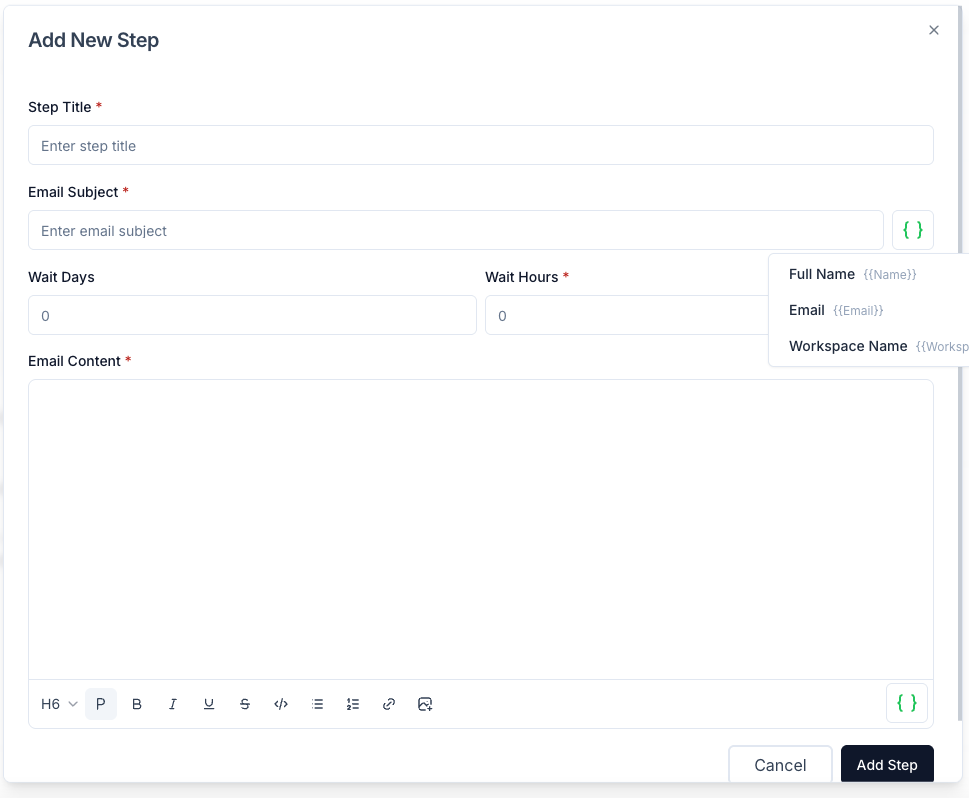
Step 5: Save the Email Step #
- Click the “Add Step” button to save the email sequence step.
- Repeat the process for additional steps if needed.
Once the steps are added, Taskip will automatically send emails according to the sequence timing.
How to set a trigger for an email sequence? #
To automate your email sequence based on specific deal events, follow these steps to set a trigger in Taskip.
Step 1: Open the Sales Pipeline
- Navigate to the Dashboard.
- Click on Sales Pipeline from the left sidebar.
Step 2: Open the Deal’s Email Sequence
- Click on the deal name to open its details.
- Select the Email Sequence tab.
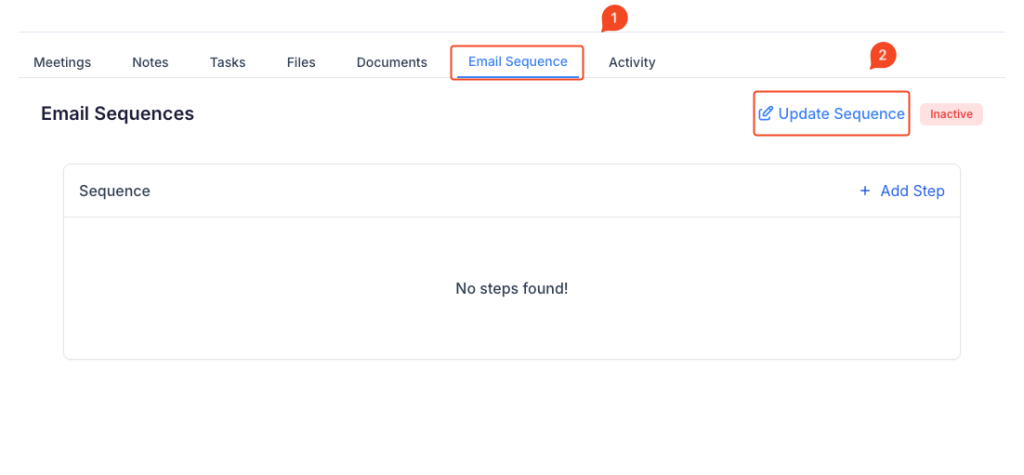
Step 3: Update the Email Sequence Trigger
- Click on “Update Sequence” in the top-right corner.
- The Update Email Sequence modal will appear.
Step 4: Select a Trigger Type
- Click on the Trigger Type dropdown menu.
- Choose one of the following triggers:
- Deal Created Date – Triggers emails based on when the deal was created.
- Deal Closed Date – Starts the sequence after the deal is closed.
- Deal Stage Change – Triggers emails when the deal moves to a new stage.
- Deal Task Complete – Starts when a task associated with the deal is marked complete.
- Deal Meeting Complete – Sends emails after a scheduled meeting is completed.
- Custom Date – Allows manual scheduling of the sequence.
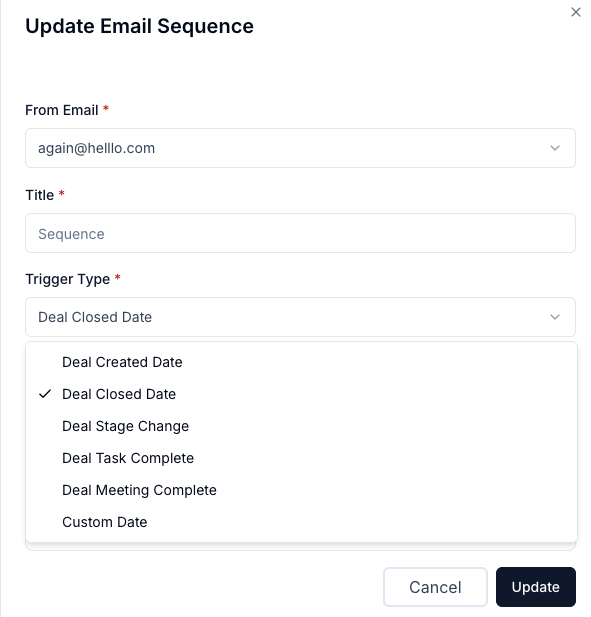
Step 5: Save Changes #
- After selecting the desired trigger, click “Update” to save the settings.
- The sequence will now start based on the selected event.
Your email sequence is now set to trigger automatically based on deal activity!


