Project Settings #
Project Settings in Taskip allow you to manage workspace-wide configurations for how projects are organized and tracked.
These settings ensure consistency across all projects and help your team work more efficiently.
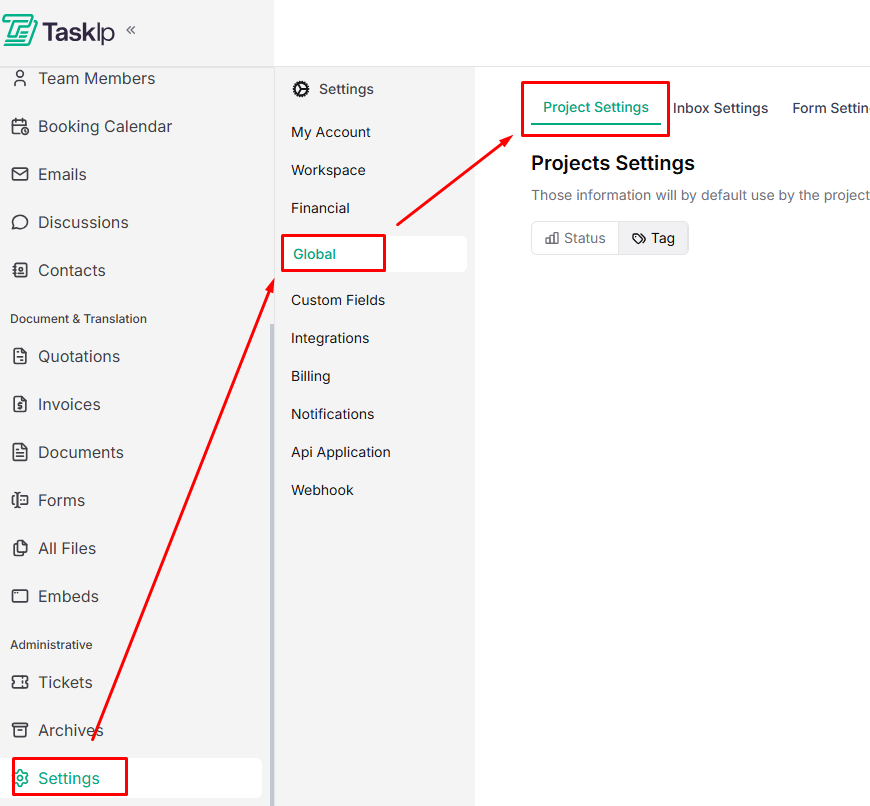
Navigation Path #
Settings → Global → Project Settings
Project Settings Configuration #
This defines default statuses and tags used by the project system across all projects.
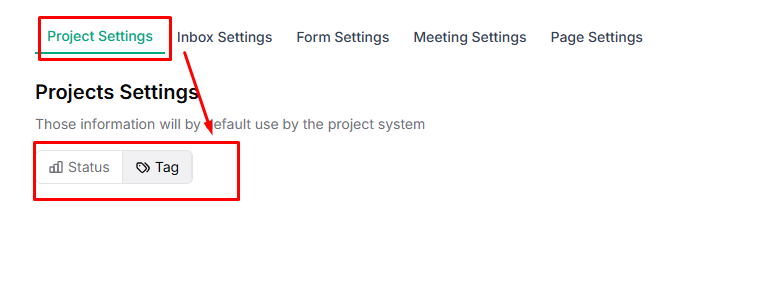
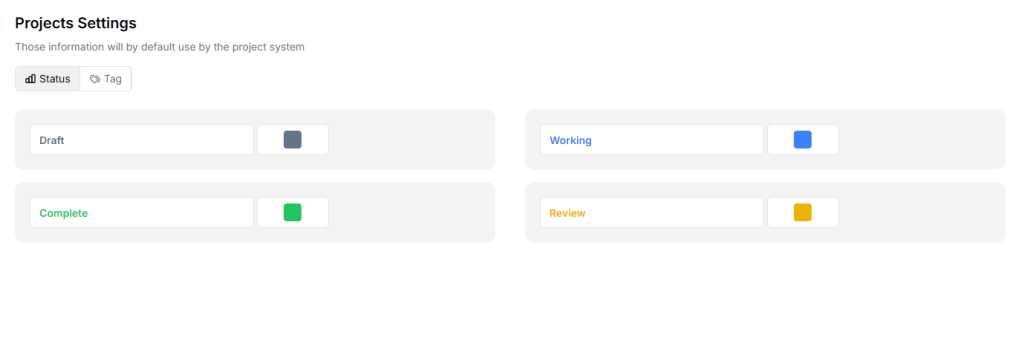
Status #
Manage project stages with the following default options:
- Draft
- Working
- Complete
- Review
| 💡 Tip: Use clear and meaningful status names so team members can quickly understand project progress. |
Tag #
The Tag tab helps you organize and filter projects efficiently.
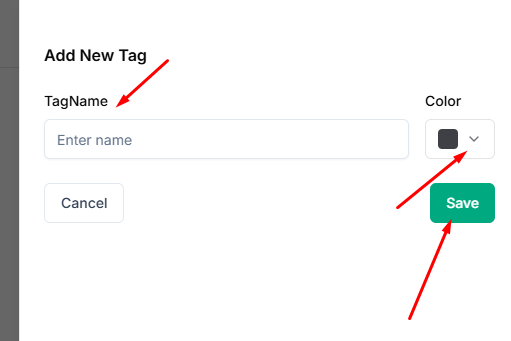
- Go to Tag and click Add Tag.
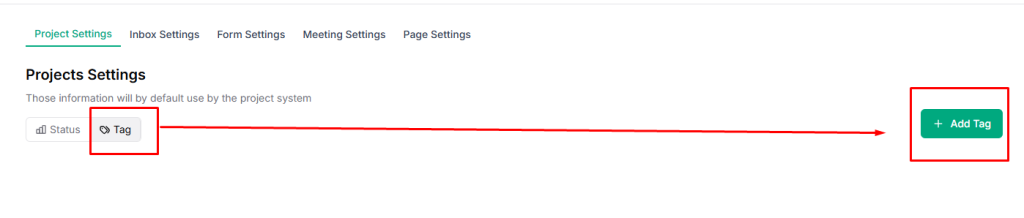
- Add a Tag Name, select the desired color from the dropdown Color menu, and click Save.
| 💡 Tip: Keep tags short and consistent to avoid duplication and confusion. |
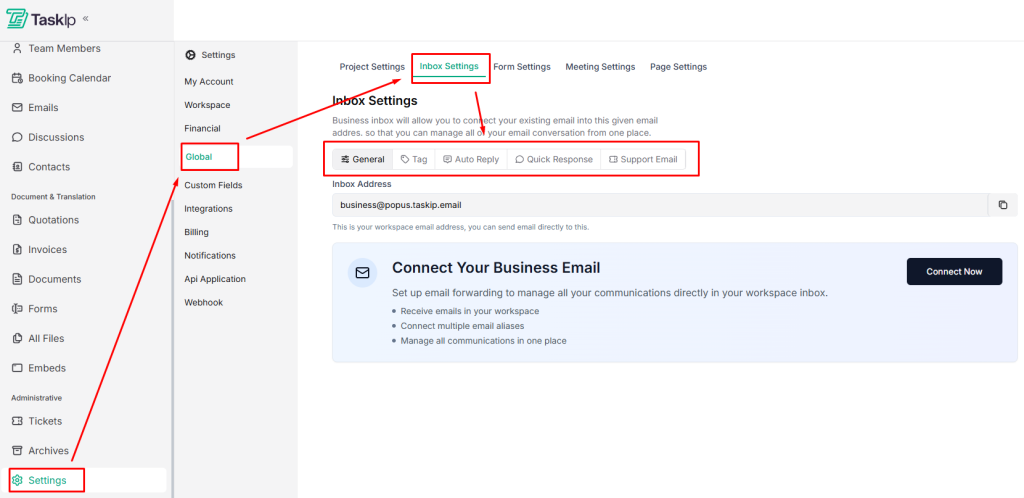
Inbox Settings #
The Business Inbox lets you connect your existing email to your Taskip workspace, so you can manage all email conversations from a single place.
Navigation Path #
Settings → Global → Inbox Settings → General / Tag / Auto Reply / Quick Response/ Support Email
Inbox Settings Configuration #
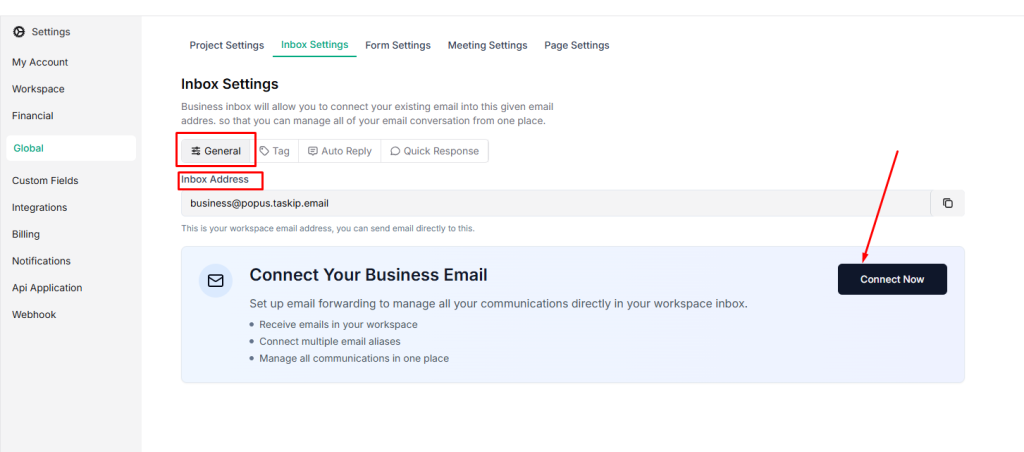
General #
- Go to Inbox Settings → General
- Enter your workspace email address in the Inbox Address field.
- Click Connect Now to link your existing business email to Taskip.
Tag #
Use tags to organize and prioritize email conversations in your inbox.
- Go to Inbox → Tag
- Use default tags such as Duplicate, Replied, On Hold, Important, and Spam.
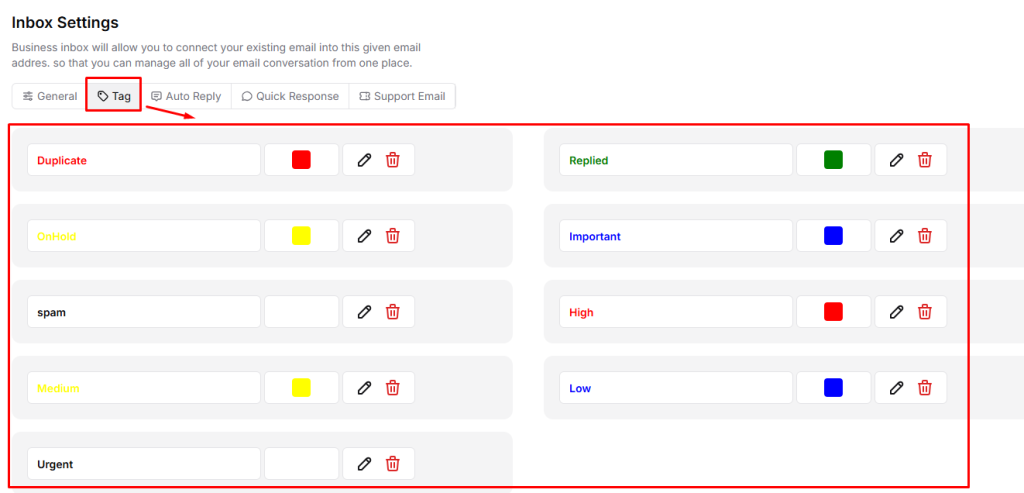
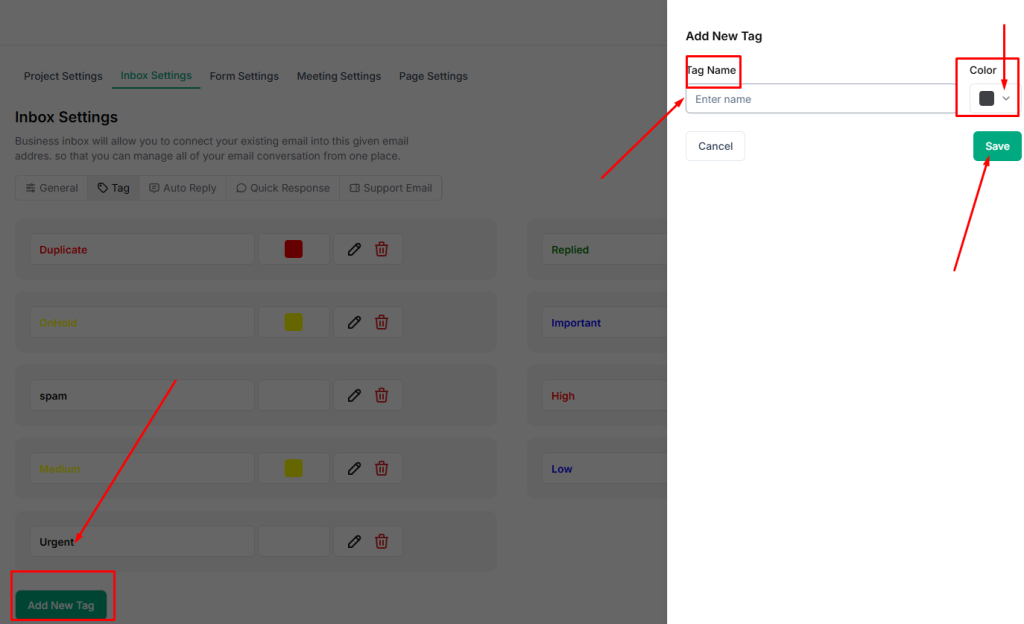
- To create new tags, click on Add New Tag, type the name of the tag, select a tag color from the dropdown menu, and save it.
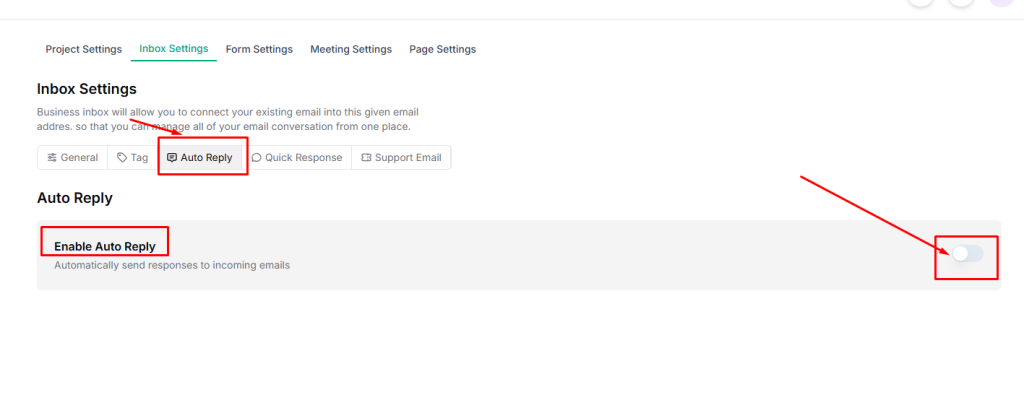
Auto Reply #
This feature automatically sends responses to incoming emails.
- Go to Inbox Settings → Auto Reply
- Enable Auto Reply toggle
- Set the Email Subject using the {{subject}} variable.

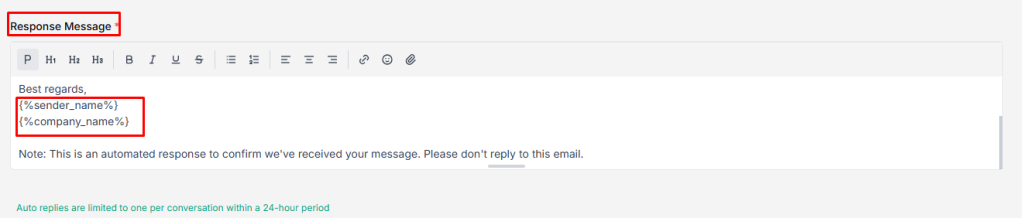
- Write the Response Message using:
- {%sender_name%} – Sender’s name
- {%company_name%} – Your company name
- Click Save to apply the auto-reply settings.
| ⚠️ Note: Limited to one auto-reply per conversation within 24 hours. |
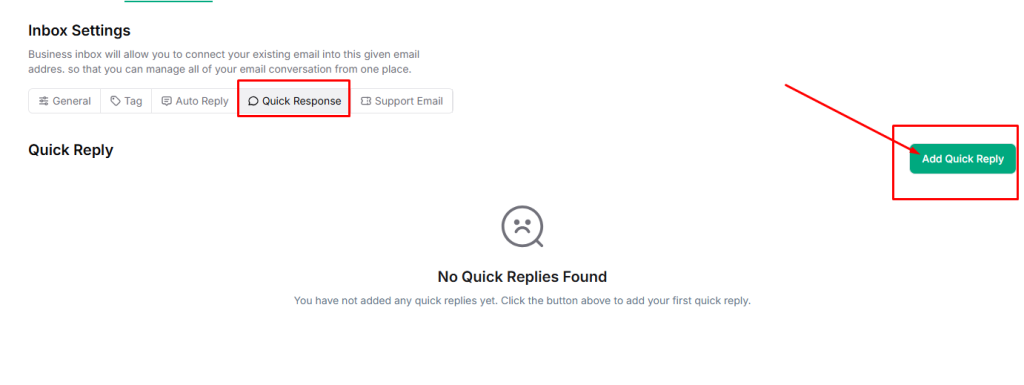
Quick Response #
Quick Responses let you create reusable reply templates for faster and consistent email communication.
- Go to Inbox Settings → Quick Response.
- To set an automatic reply, click Add Quick Reply.
- Enter a Title for the reply (used for internal reference only).
- Write a Description that will be used as the quick reply message.
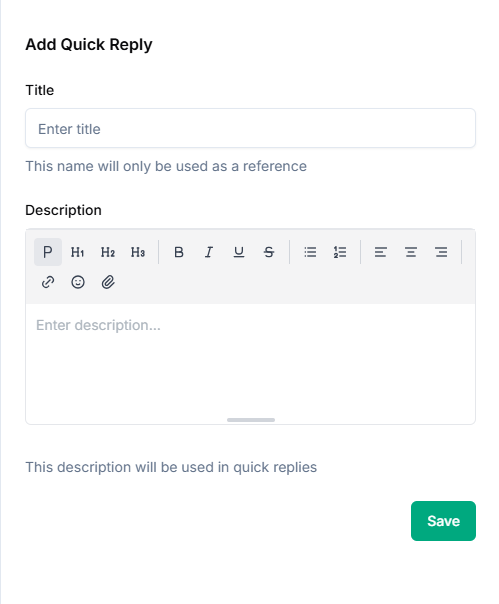
- Click Save to add the quick response.
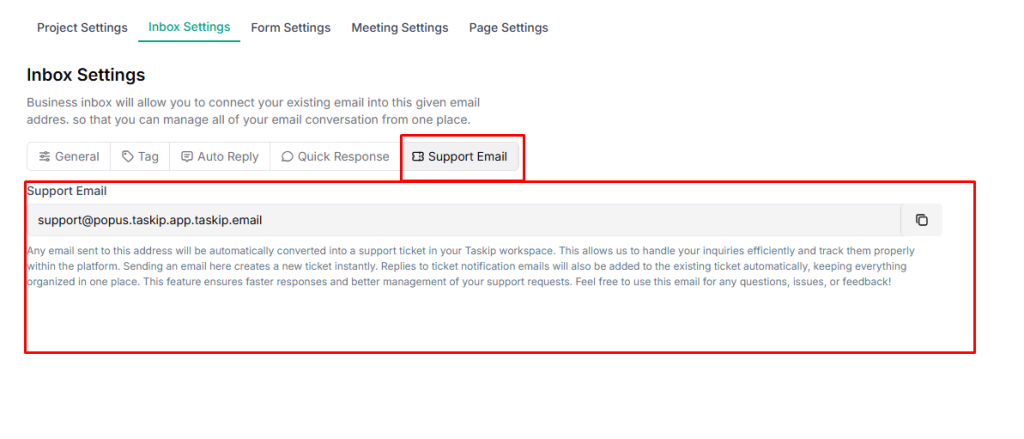
Support Ticket #
Taskip provides a dedicated support email address that automatically converts incoming emails into support tickets.
This ensures all support requests are properly tracked, organized, and managed within your workspace.
Navigation Path: Inbox Settings → Support Email
Support Email Address: [email protected]
How It Works
- Sending an email to this address creates a new support ticket instantly.
- Replies to ticket notification emails are automatically added to the same ticket.
- All related communication remains centralized in one place, making it easier to track updates and responses.
When to Use This Email
Use the support email for:
- Reporting issues or bugs
- Asking questions about Taskip features
- Sharing feedback or suggestions
| 💡 Tip: Always reply to the ticket notification email to keep the conversation linked to the same support ticket. |
Form Settings #
Form Settings in Taskip let you manage how form submissions are tracked by defining submission statuses.
These statuses help your team quickly identify the state and priority of each submission.
- Navigation Path: Settings → Global → Form Settings
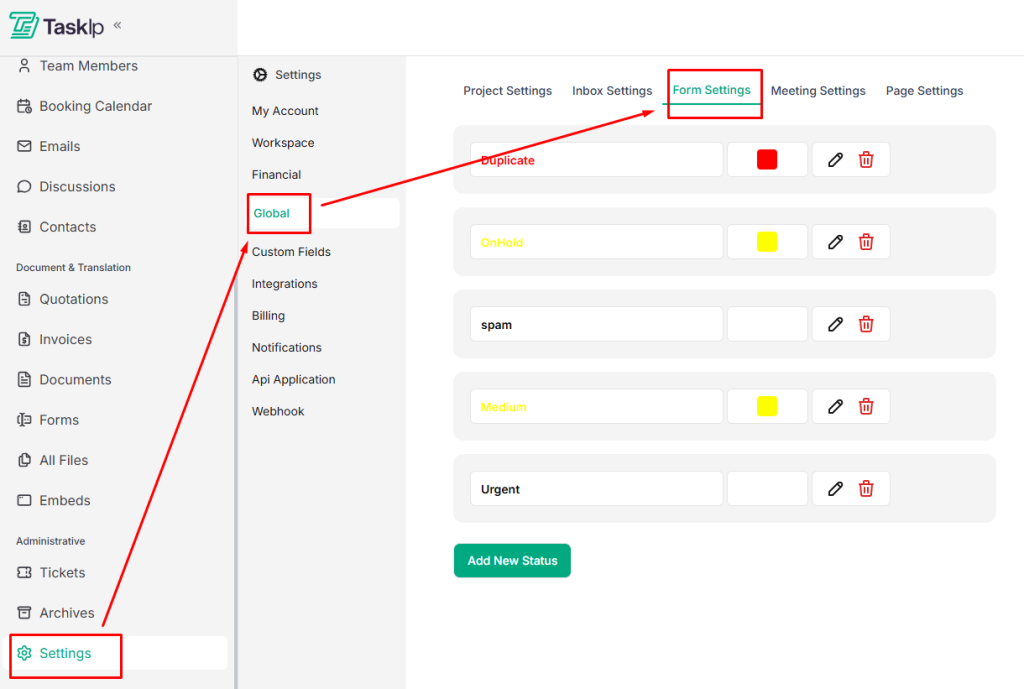
- Go through the default settings that include- Duplicate, Onhold, Urgent, etc.
- To edit or remove a status, use the available options next to each status.
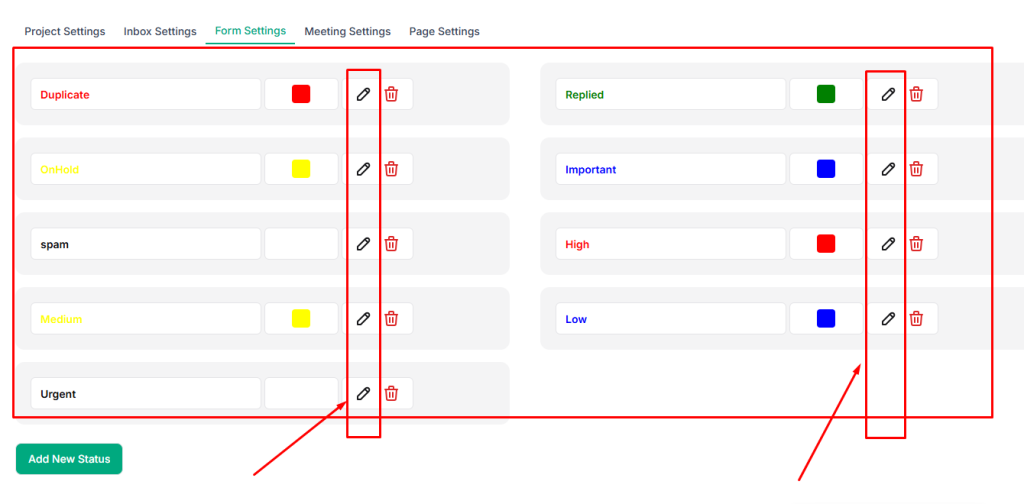
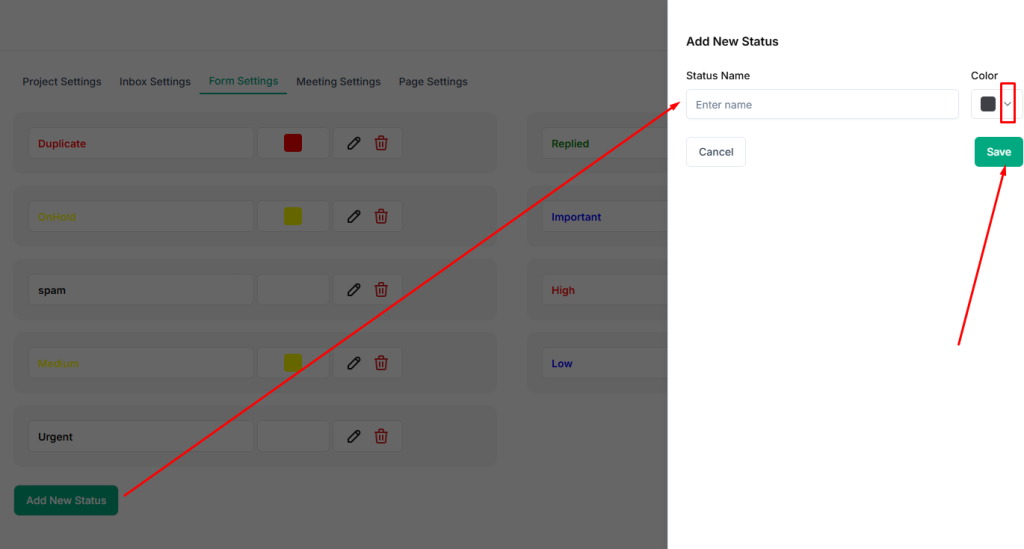
- To add a new status, click Add New Status.
- Write the Status Name and select a Color from the dropdown menu.
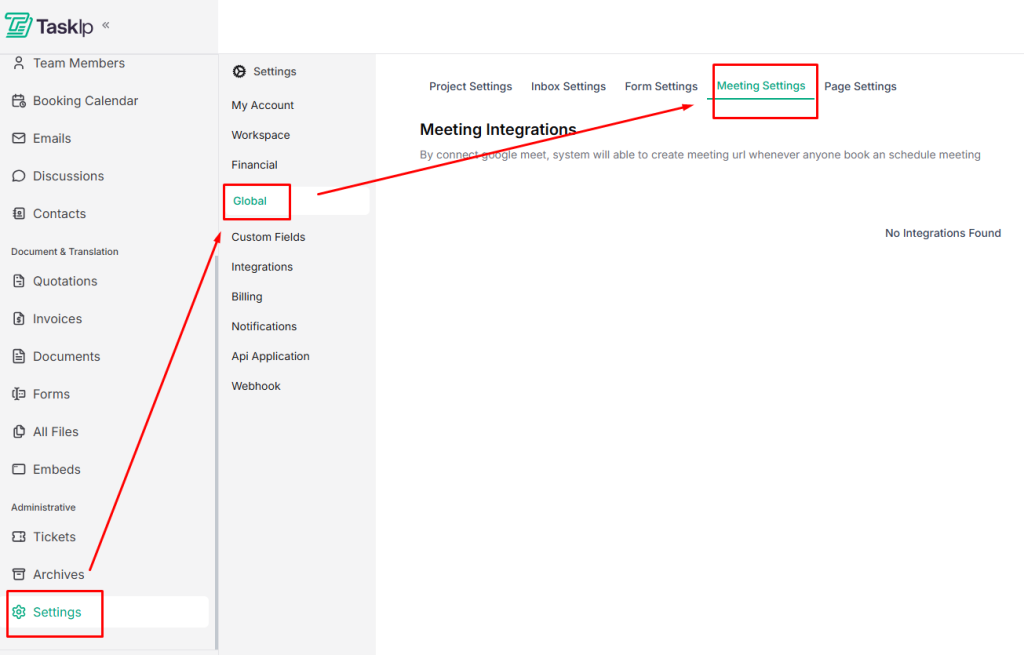
Meeting Settings #
Meeting Settings in Taskip allow you to integrate video conferencing platforms like Google Meet or Zoom.
Once connected, the system can automatically generate meeting URLs whenever someone books a scheduled meeting.
Meeting Settings Configuration
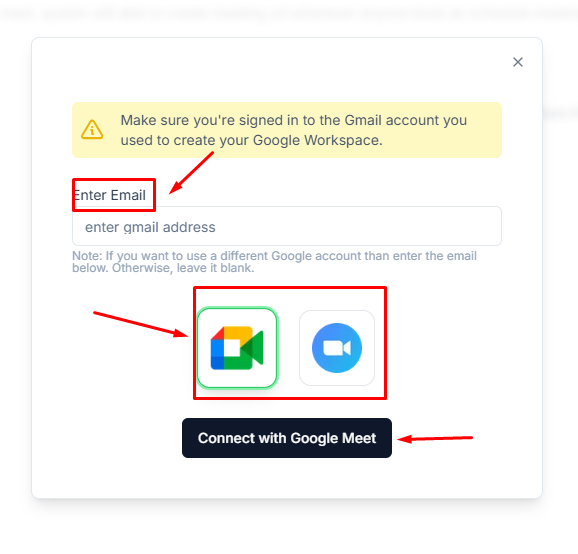
- Go to Settings → Global → Meeting Settings.
- Click Add New Integration.

- Enter your email address.
- Choose your meeting platform: Google Meet or Zoom.
- Click Connect to link the platform to Taskip.
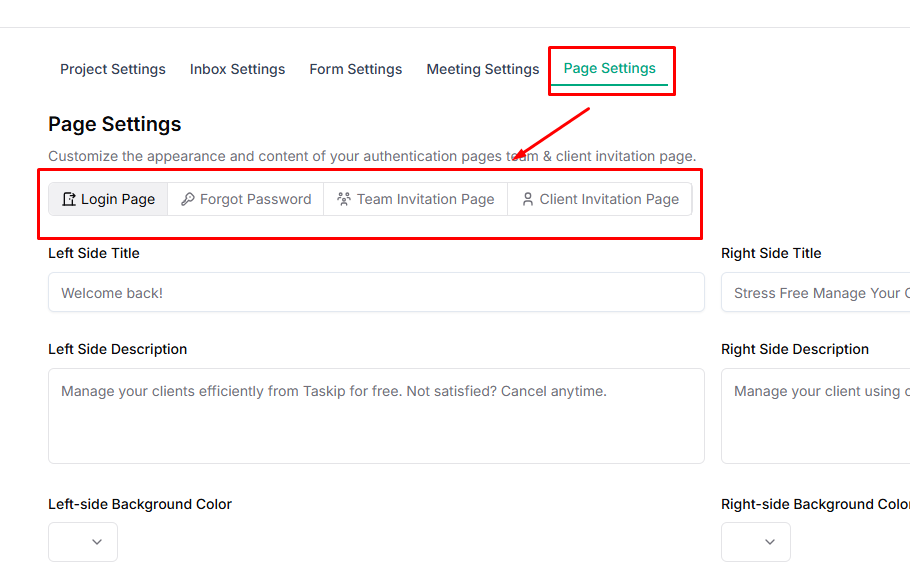
Page Settings #
Page Settings in Taskip let you customize authentication and invitation pages to match your branding. You can update titles, descriptions, colors, and images for a consistent, professional look across your workspace.
Page Settings Configuration
- Go to Settings → Global → Page Settings

- Select the page type you want to customize:
- Login
- Forgot Password
- Team Invitation
- Client Invitation
- For each page, you can:
- Edit Titles and Descriptions for the left and right side
- Set background colors
- Upload custom images
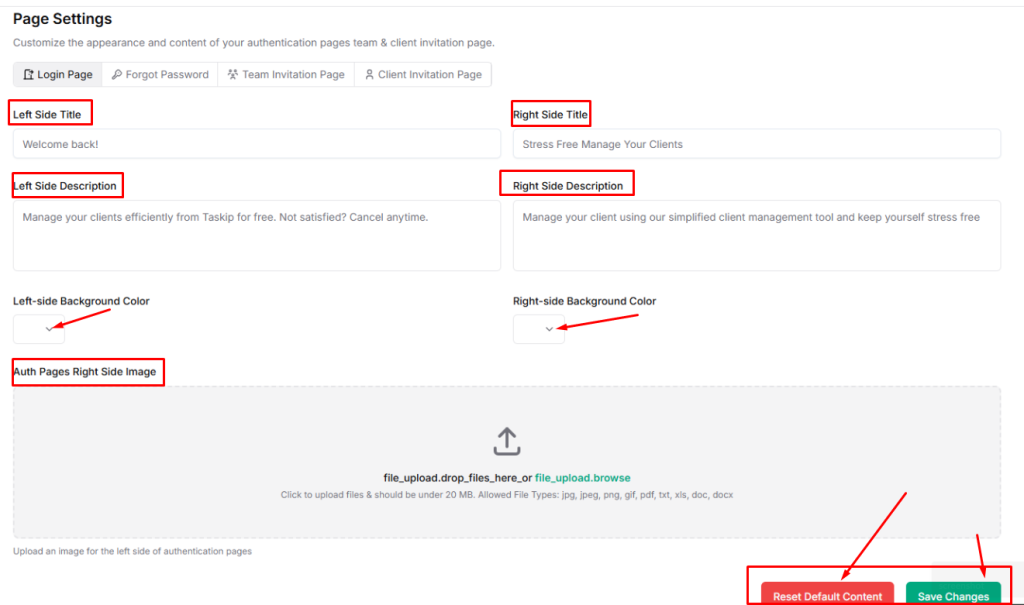
- Click Save Changes to apply updates, or Reset Default Content to revert to the original design.
| 💡 Tip: Customizing these pages ensures a consistent and professional experience for both team members and clients. |
Support Settings #
Support Settings in Taskip allow you to configure how customer support emails are handled in your workspace. By setting up a dedicated support email, incoming messages can automatically be converted into support tickets, helping your team manage inquiries, issues, and feedback in an organized way.
Proper configuration ensures faster responses, better tracking of customer issues, and a centralized support workflow.
Navigation Path #
Settings → Global → Support Settings
You are getting Taskip Support in three formats:
Support Email #
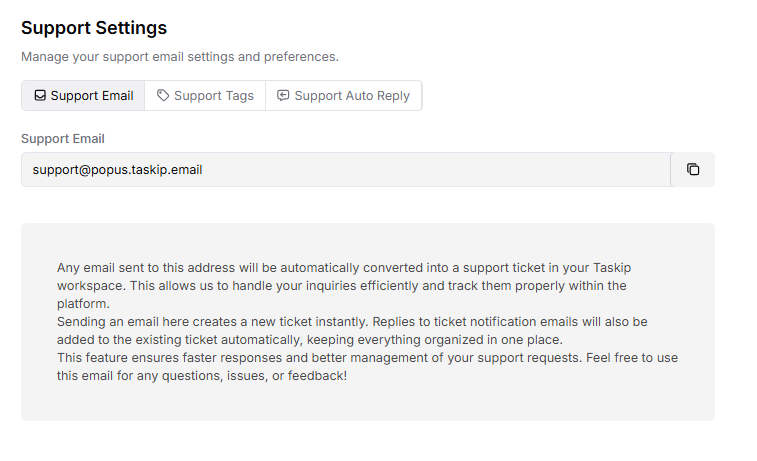
- Enter or copy the support email address assigned to your workspace.
- Any email sent to this address will automatically be converted into a support ticket in Taskip.
- Each new email creates a new ticket, making it easy to track customer issues.
- Replies to ticket notification emails will automatically attach to the same ticket, keeping all conversations organized in one place.
💡 Tip: Share this support email with your customers so they can easily submit support requests.
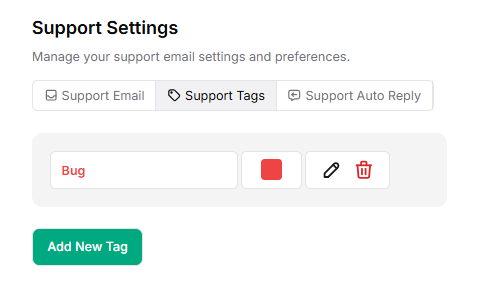
Support Tags #
Go to the Support Tags tab.
Support tags help categorize and organize incoming support tickets.
- Click Add Tag to create a new support tag.
- Assign tags such as Bug, Billing, Feature Request, or Technical Issue.
- Apply these tags to tickets to quickly filter and manage support requests.
💡 Tip: Using consistent tags helps your team prioritize and track recurring issues efficiently.
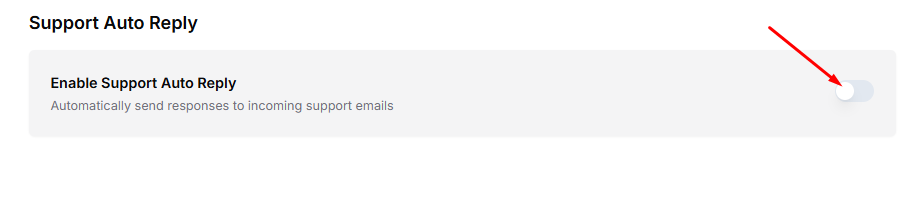
Support Auto Replay #
The Support Auto Reply feature automatically sends a response to users when they email your support address. This confirms that their request has been received and that your team will review it soon.
Enable Support Auto Reply #
- Go to the Support Auto Reply tab.
- Enable the Support Auto Reply toggle.
- Once enabled, Taskip will automatically send responses to incoming support emails.
This ensures customers receive an immediate acknowledgment, improving communication and reducing repeated follow-up emails.
💡 Tip: Use a clear and friendly auto-reply message to let users know their request has been received and when they can expect a response.
Invoicing Setting #
Financial settings let you configure how invoices and quotations are numbered, schedule payment reminders, and set up default notes for invoices.
Proper configuration ensures consistent branding and helps your clients pay on time.
Navigation Path #
Settings → Financial → Invoice → General / Reminder / Template / Note
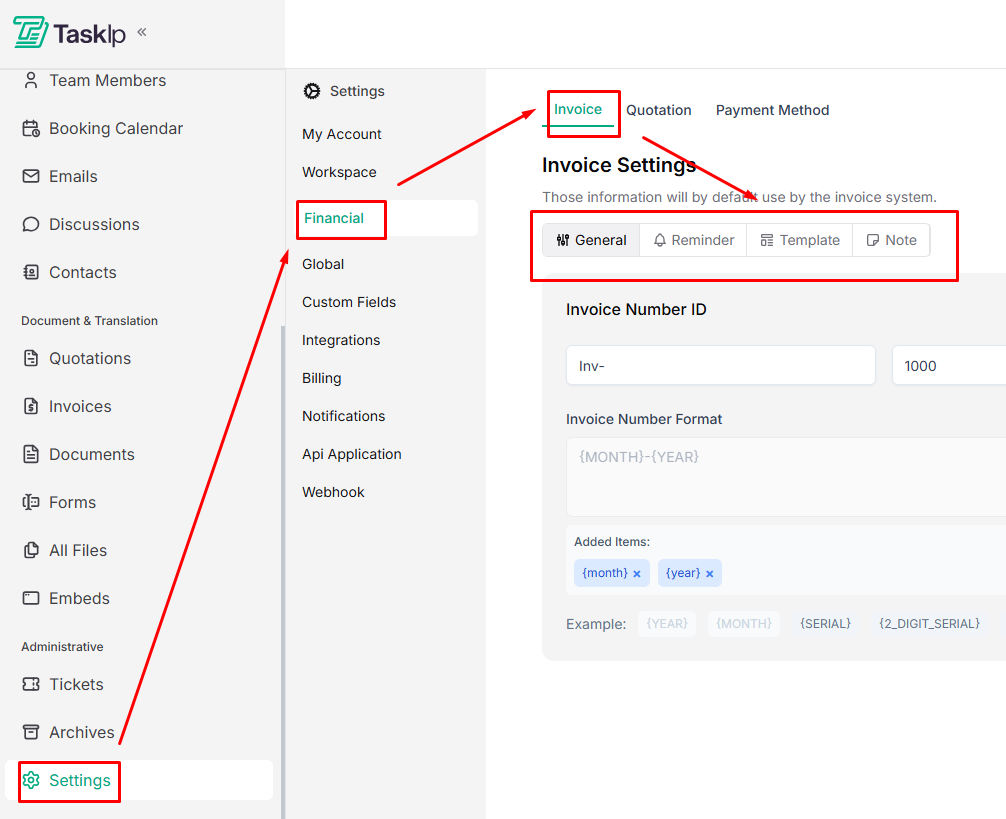
General #
- Go to the General tab.
- Customize your Invoice Number ID using format tokens.
Available tokens:- {year} – Current year
- {month} – Current month
- {serial} – Incremental number
- {2_digit_serial} through {6_digit_serial} – Serial numbers with fixed digits
- Preview your format in the Example field to see how your invoice numbers will appear.
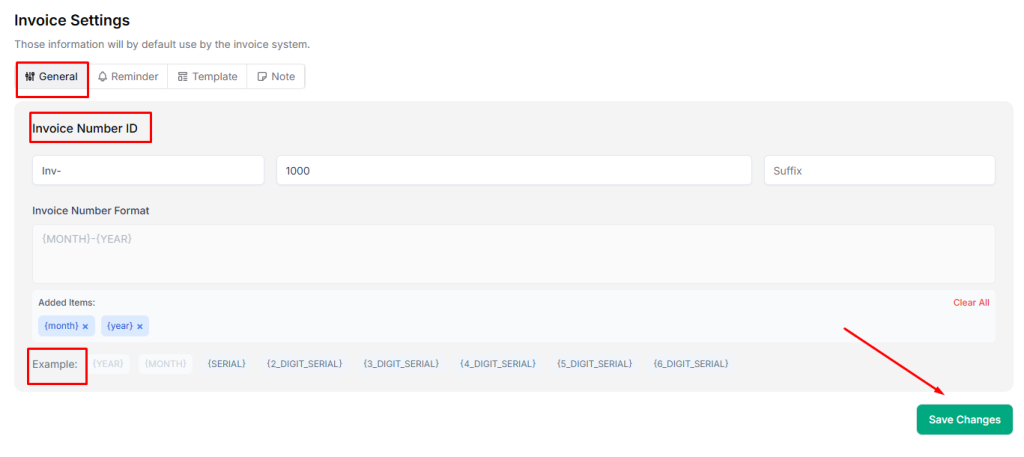
| 💡 Tip: Use a consistent numbering format for easy tracking and reporting. |
Reminder #
- Switch to the Reminder tab.
- Click Add Reminder to create a payment reminder.
- Enable the Reminder toggle.
- Specify the number of days before the due date to send the reminder.
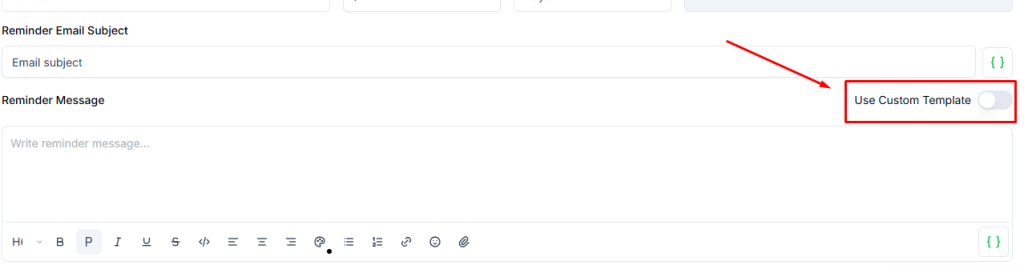
- Customize the email subject and message.
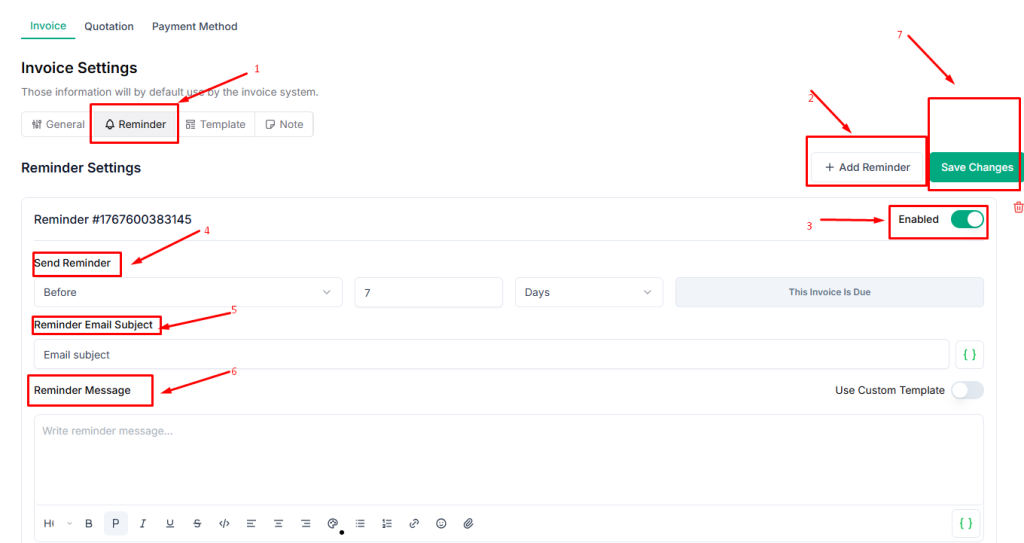
- Optionally, select a custom template:
- Invoice Due Reminder
- Invoice Overview
- Send Invoice
| 💡 Tip: Sending reminders before the due date helps reduce overdue payments. |
Template #
Switch to the Template tab and select your preferred invoice template.

Note #
- Go to the Note tab.
- Click on Add Note.
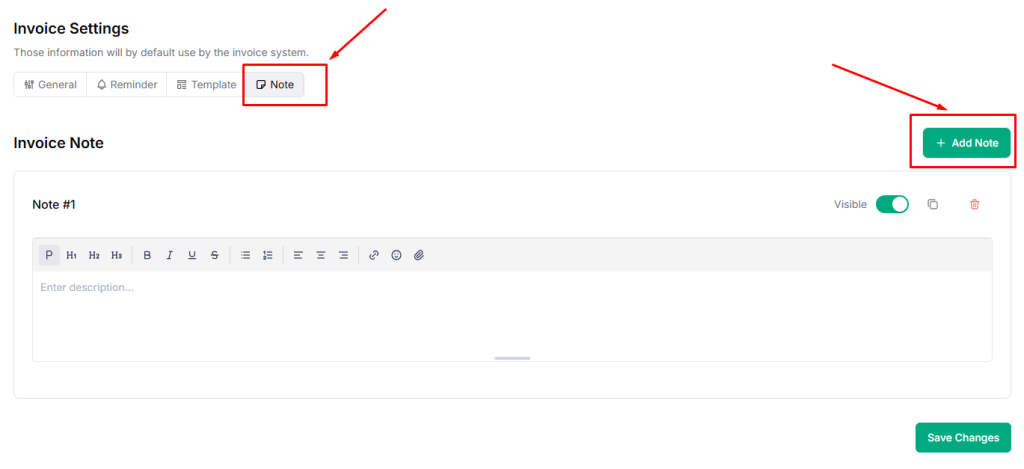
- Add default notes that should appear on all invoices (e.g., payment terms, policies, or additional instructions).
- Enable the Visible option and click Save Changes.

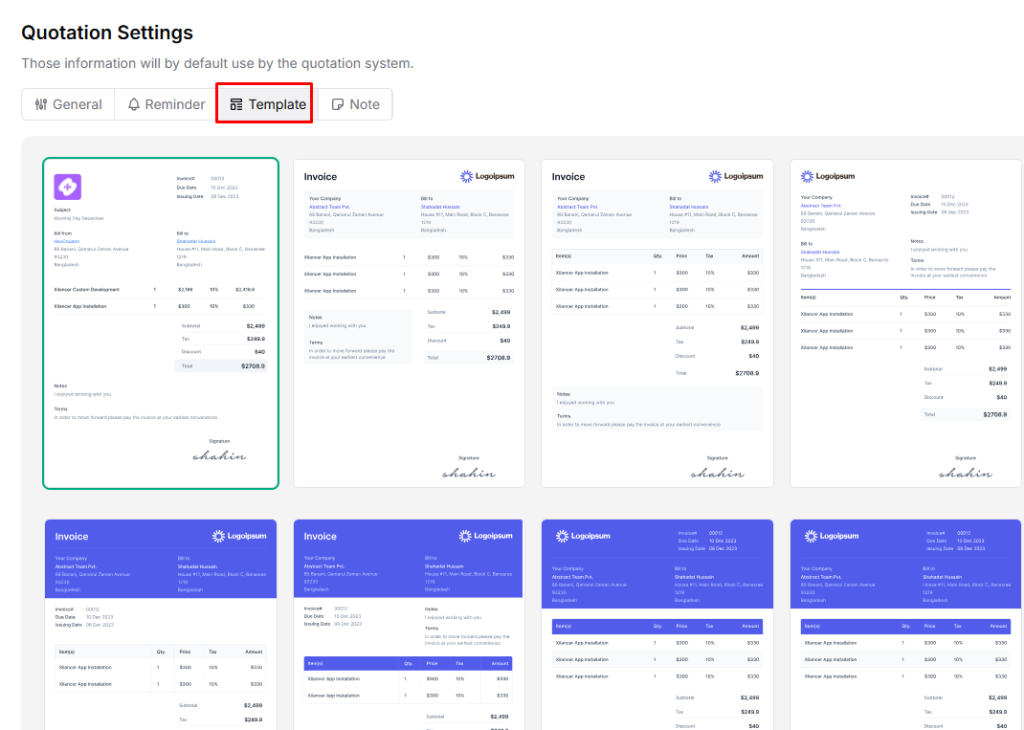
Quotation Settings #
Quotation settings in Taskip allow you to manage how quotations are numbered, choose templates, set up reminders, and add default notes.
Proper configuration ensures your quotations remain professional, consistent, and easy for clients to understand.
Navigation Path #
Settings →Global→ Quotation→ General / Reminder / Template / Note

The process of configuring quotation numbering format, reminders, templates, and notes is the same as setting up invoices.
General #
- Go to the General tab.
- Customize your Quotation Number ID using format tokens.
Available tokens:
- {year} – Current year
- {month} – Current month
- {serial} – Incremental number
- {2_digit_serial} through {6_digit_serial} – Serial numbers with fixed digits
- Preview your format in the Example field to see how your quotation numbers will appear.
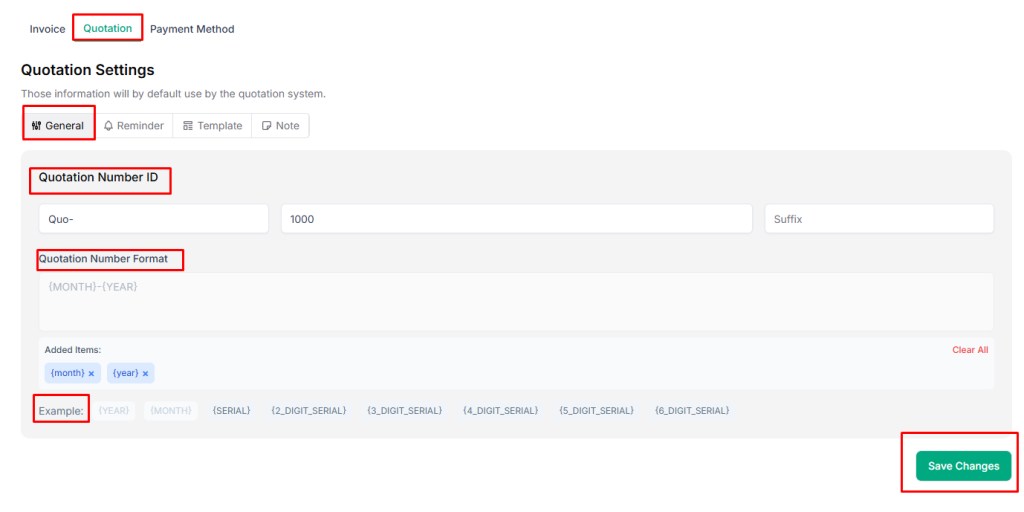
| 💡 Tip: Use a consistent numbering format for easy tracking and reporting. |
Reminder #
- Switch to the Reminder tab.
- Click Add Reminder to create a payment reminder.
- Enable the Reminder toggle.
- Specify the number of days before the due date to send the reminder.
- Customize the email subject and message.
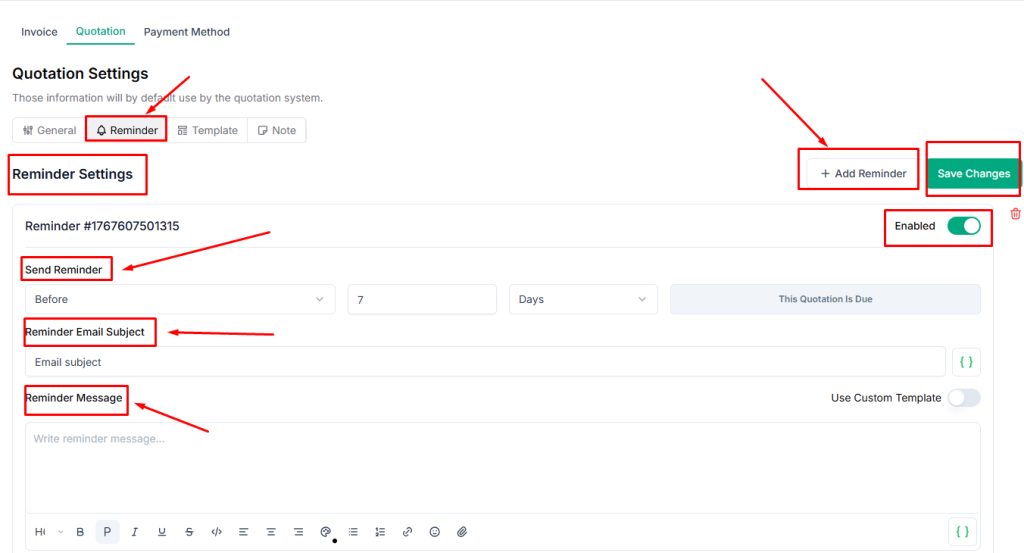
- Optionally, select a custom template:
- Quotation Due Reminder
- Quotation Send
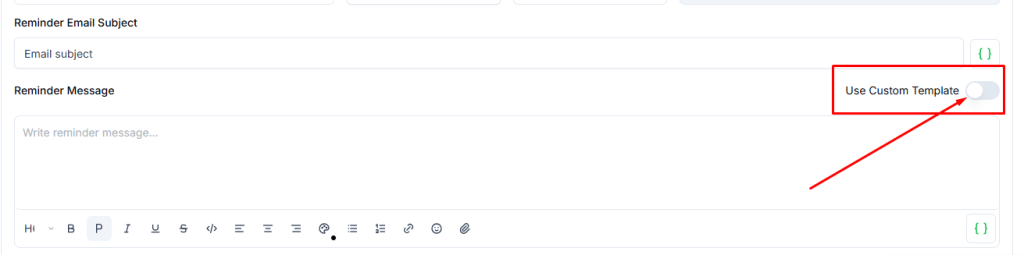
| 💡 Tip: Sending reminders before the due date helps reduce overdue payments. |
Template #
Switch to the Template tab and select your preferred invoice template.
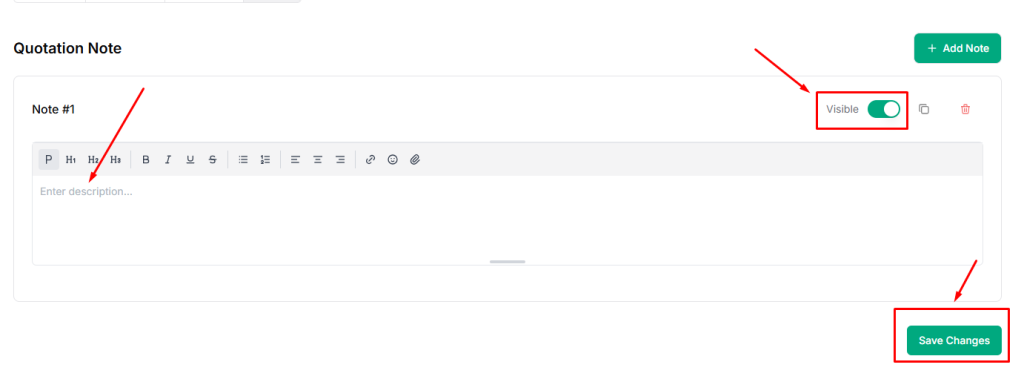
Note #
- Go to the Note tab.
- Click on Add Note.
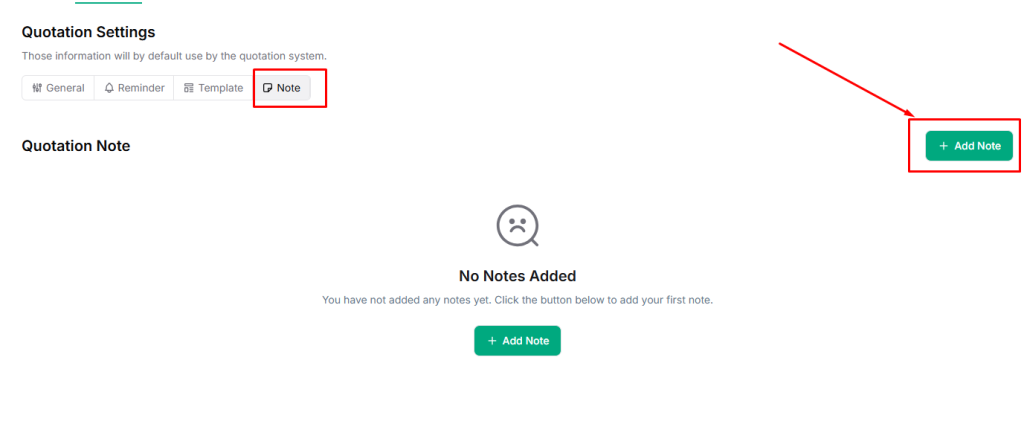
- Add default notes that should appear on all quotations (e.g., payment terms, policies, or additional instructions).
- Enable the Visible option and click Save Changes.
Portfolio Settings #
Portfolio Category Settings in Taskip allow you to organize your portfolio items into different categories. This helps structure your work samples and makes it easier for clients to browse and understand the types of services or projects you offer.
Add a New Portfolio Category #
You can create categories to group similar portfolio items.
Settings → Global→Portfolio → Portfolio Categories
- Go to the Portfolio Categories tab.
- Click Add New Category.
- Enter the category name (e.g., Digital Marketing, UX Designing).
- Click Save to create the category.
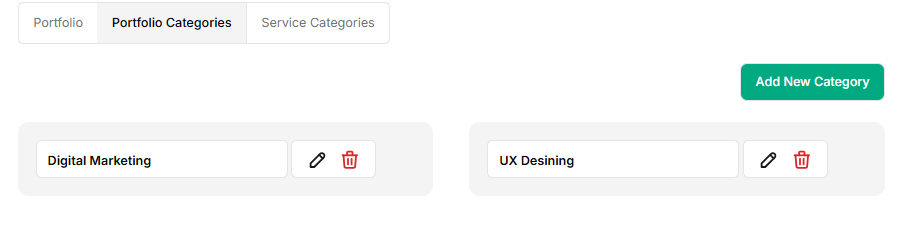
💡 Tip: Use clear and descriptive category names so clients can easily understand the type of work displayed.
Add a New Service Category #
You can create categories to group similar services together.
Settings → Global→Portfolio → Service Categories
- Go to the Service Categories tab.
- Click Add New Service Category.
- Enter the service category name (e.g., Portfolio Web Design, UX Designing, Content Writing).
- Click Save to create the category.
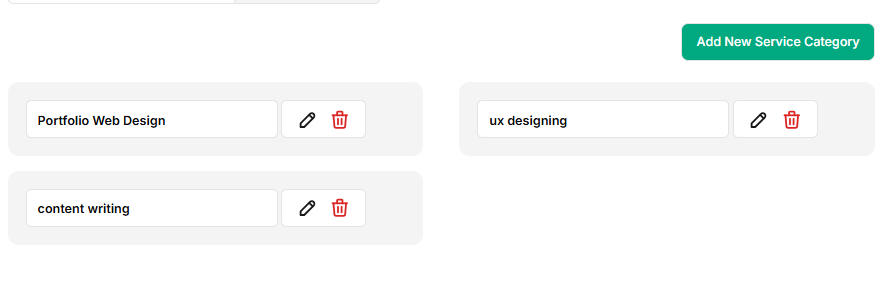
💡 Tip: Use clear category names to help clients easily find the services they need.
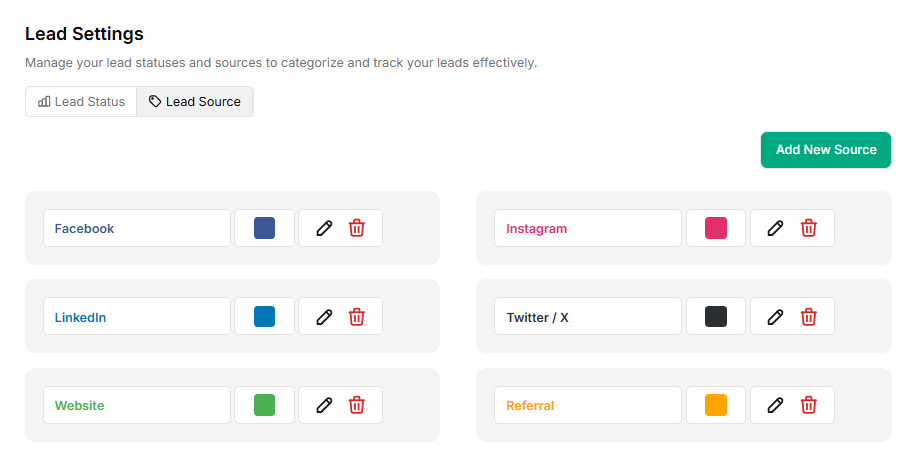
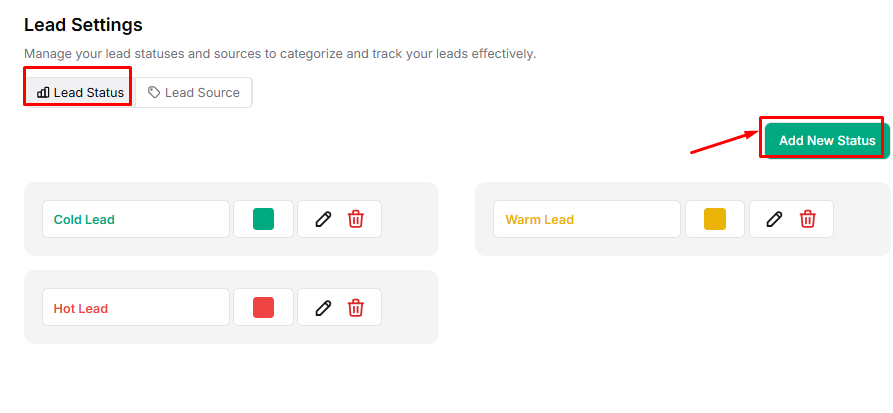
Leads Settings #
Lead Source Settings in Taskip allow you to track where your leads are coming from. By categorizing lead sources, you can understand which platforms or channels generate the most potential clients.
Navigation Path
Lead Status #
- Click ‘Add New Lead.’
- Give the lead name and select a color.
- click save
Lead Source #
The lead source expresses from where a lead comes.
- Click ‘Add New Source’.